
This article covers the topic of room data sheets. First, it explains the general concept. After that, it goes into the details of creating room data sheets in BriefBuilder.
What are room data sheets?
Room data sheets (RDSs) are structured overviews of the requirements that apply to the specific room types in a building. They are a key part of any project brief / architectural program for a building project.
In their classic book Problem seeking: an architectural programming primer (2012), architects William Peña and Steven Parshall define room data sheets as “a means and a method to define the ‘inside’ of a space, addressing architectural, material and engineering requirements, furniture layouts and relevant equipment”.
It is worth noting that the term room data sheet is not entirely correct because it suggests that they only concern the building’s enclosed spaces (rooms), where in reality, they can also encompass open spaces (e.g. an open-plan office), outdoor spaces (e.g. a playground) and infrastructural spaces (e.g. an access road).
But, that makes little difference to the central purpose, which is to systematically record all the relevant requirements per spatial entity.
In this article, we’ll explain how you can use BriefBuilder to create room data sheets for your project.
Creating room data sheets in BriefBuilder
In BriefBuilder, spaces can be defined in the Spaces & locations tree.
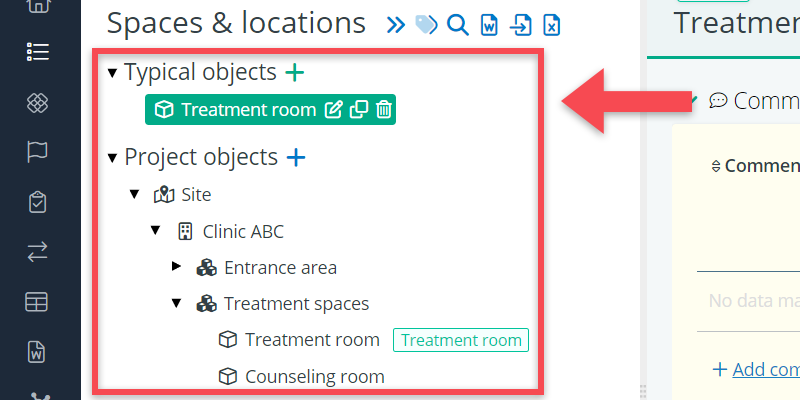
In this tree (database speak for a structured list), you can define typicals and project spaces. Typicals are the characteristic ‘building blocks’ or room types for your project, e.g. specific lab types for research facilities or different types of patient rooms for hospitals. Project spaces are the actual spaces that you need for specific departments or specific parts of the building.
For both the typicals and the project spaces you can create room data sheets (aka detail views). Just click on a space in the tree view and you will see the details on the right-hand side.
The detail views in BriefBuilder are often structured as follows:
- Description: a short description of the space’s functional purpose.
- Classification/numbering: a room number or other kind of ID.
- Spatial requirements: requirements concerning size, height, zoning and other spatial properties.
- Indoor climate: requirements concerning air quality and thermal-, visual- and acoustic comfort.
- Adjacencies: requirements concerning the space’s position in relation to other spaces.
- Spatial elements: the required finishes, fixtures, fittings and furniture elements in a space.
- Use / functionality (optionally): a description of the space’s users and their activities
- User equipment (optionally): a description of the equipment that will be placed in a space.
Each of these aspects is explained in more detail below.
Description
At the top of a space’s detail view, under General, you will find a description field where you can add a short description of the space’s functional purpose. Usually, the description explains the space’s key characteristics (e.g. enclosed or open) and the kinds of activities that it should facilitate. See the example below.

You can also add a diagram or reference image to your description. Right next to the description field, there is an optional field where you can upload one.
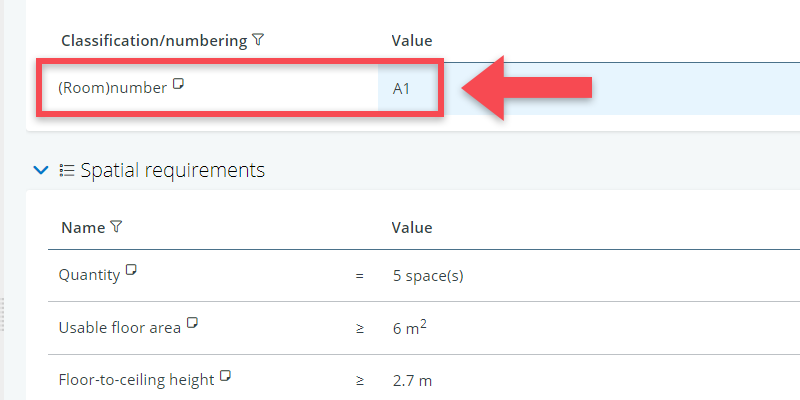
Classification / numbering
In the same block (General), there is also an entry field for a classification or numbering of spaces. This is usually a room number, but you can decide this for yourself. It can even be that a room holds multiple numberings, e.g. both a functional number and a geographic number.
Spatial requirements
The property block Spatial requirements is intended for standard properties concerning size, height, zoning and other spatial matters. In the default setup, BriefBuilder provides you with two standard properties:
- Quantity: the required number of spaces of that type.
- Usable floor area: the minimum size of the space, expressed in usable square meters (or square feet).

Usually, you will want more specifications than just these two. Frequently used properties are floor-to-ceiling height, capacity and security zone. To add such standard properties, follow these steps:
- Go to the settings menu (at the bottom of the navigation menu) or click on the More options menu for the relevant table ( ).
- In the settings menu, navigate to Attributes and then Requirements
- Select Space as the object type and create or select a relevant property table.
- Click on + Add standard property to create a new standard property in an existing block.
For each standard property you can specify the following attributes:
- Name: The property’s name. E.g. Floor-to-ceiling height.
- Description: A short explanation. E.g. The clear height between floor level (including finish) and ceiling level (including finish and sub construction).
- Comparator: A symbol (>, <, =, etc.) that explains how the property’s value should be understood. E.g. a greater-than-or-equal-to symbol (≥) for a minimum requirement.
- Input type: the type of input that is allowed in the value field: text, an integer, a decimal number, or a picklist.
- Unit of measure: The unit in which a value is expressed. E.g. metre of millimetre.
- Picklist values: If you have chosen picklist as the input type, this is where you can define the value options by clicking on Add value in the pop-up.
Indoor climate
Indoor climate requirements can be captured as standard properties as well. Usually, these properties are captured in a dedicated property block with separate tables in it for acoustic comfort, thermal comfort, visual comfort and air quality.

Steps to follow:
- Again, go to Settings > Attributes > Requirements
- Again, select Space as object type
- Click on + Add block (next to the object type’s name), and call the block Indoor climate (or something like that)
- In the block, click on + Add table to create separate tables for Acoustic comfort, Thermal comfort, Visual comfort and Air quality.
- In each table, click on +Add standard property to create standard properties (e.g. reverb time, temperature level etc.)
- For each property, add a name, comparator (<, >, =, …), a unit of measure, and possibly a list of picklist options
Adjacencies
Adjacency relations explain how spaces should be positioned in relation to one another. For example stating that the tea kitchen should be in proximity to the office area, or that a storage space should be close to the delivery entrance.
Such requirements can be captured in the adjacencies table. If necessary, you can even add a requirement concerning the maximum distance between two spaces (e.g. the distance between a nursing station and a patient room in case of a hospital project).
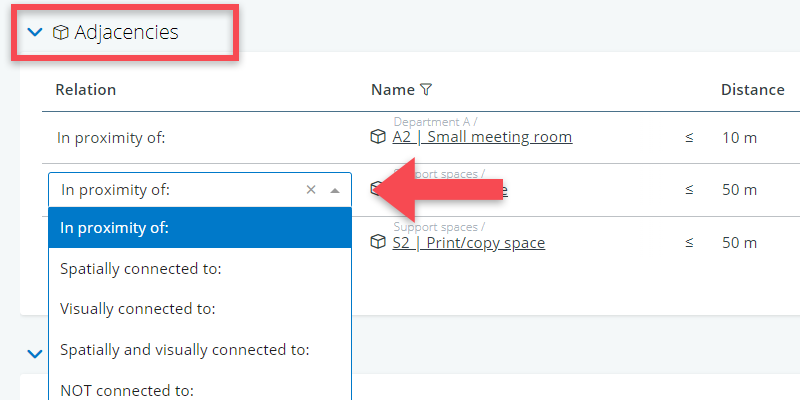
The default BriefBuilder setup provides you with the following adjacency relations:
- In proximity of
- Spatially connected to
- Visually connected to
- Spatially and visually connected to
- NOT connected to
You can easily extend or change these options via the relation picklist settings menu.
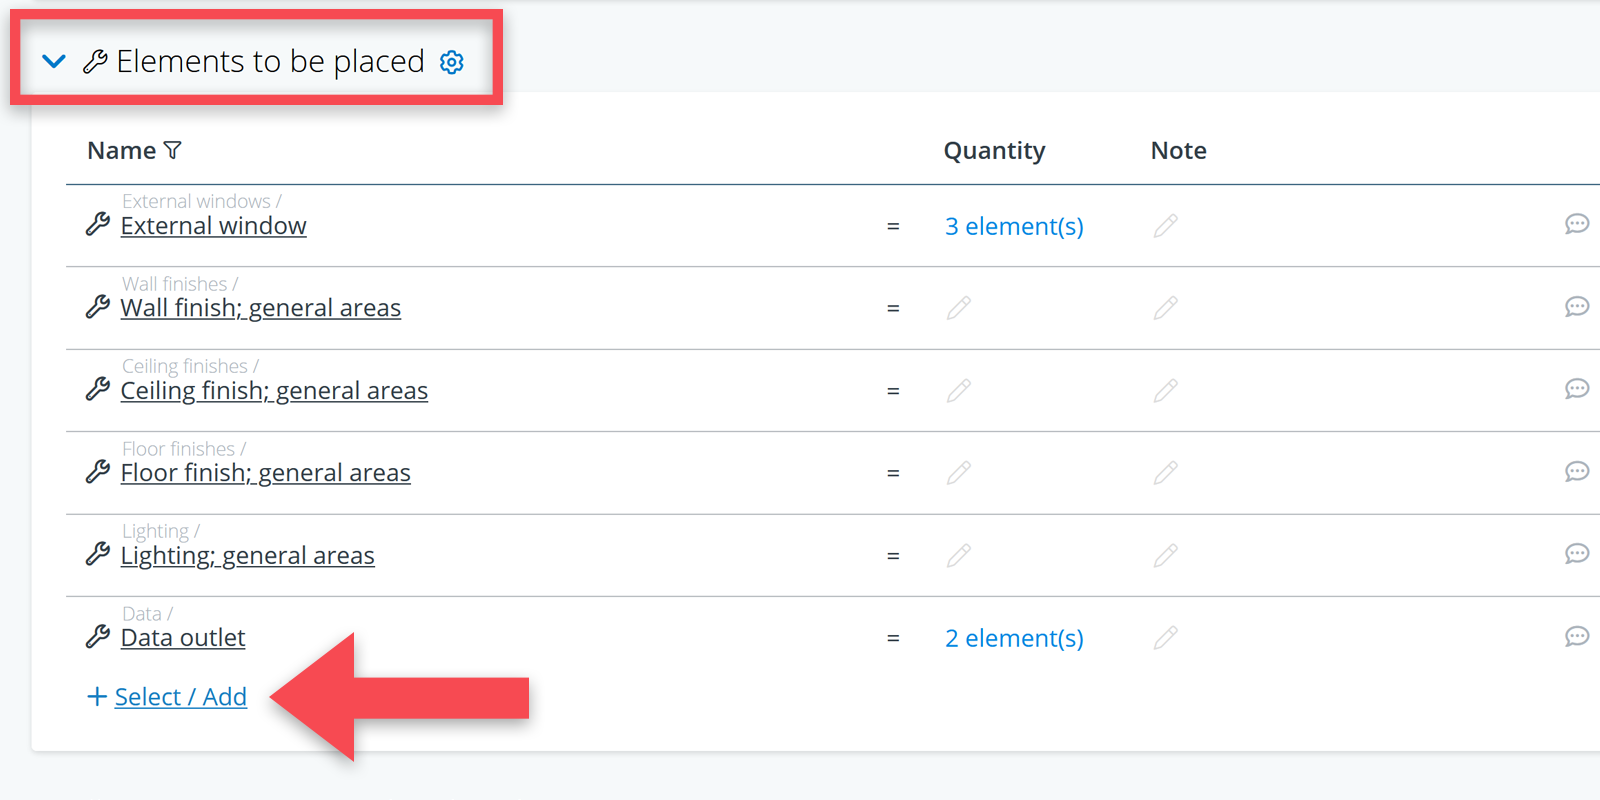
Spatial elements
In the table Elements to be placed you can define which spatial elements should be placed in a space.
These elements may concern construction elements (e.g. particular floor-, wall- and ceiling finishes), mechanical elements (e.g. gas outlets), electrical elements (e.g. power outlets), plumbing fixtures (e.g. sinks) and more. Where relevant, you can add a quantity.
This means that you first have to create the relevant elements in that tree before you can use them in your room data sheet. There are two methods to do this:
Method 1: in the relevant tree
The main method for adding elements is to go to the relevant tree (in this case Systems & elements), create them there, and then go back to the object detail page where you want to use them. This method is best if you want to add a lot of objects and also want to define their properties at the same time.
Steps to follow:
- In the navigation menu, go to Requirements > General > Systems & elements
- Click on the + button to create a new object
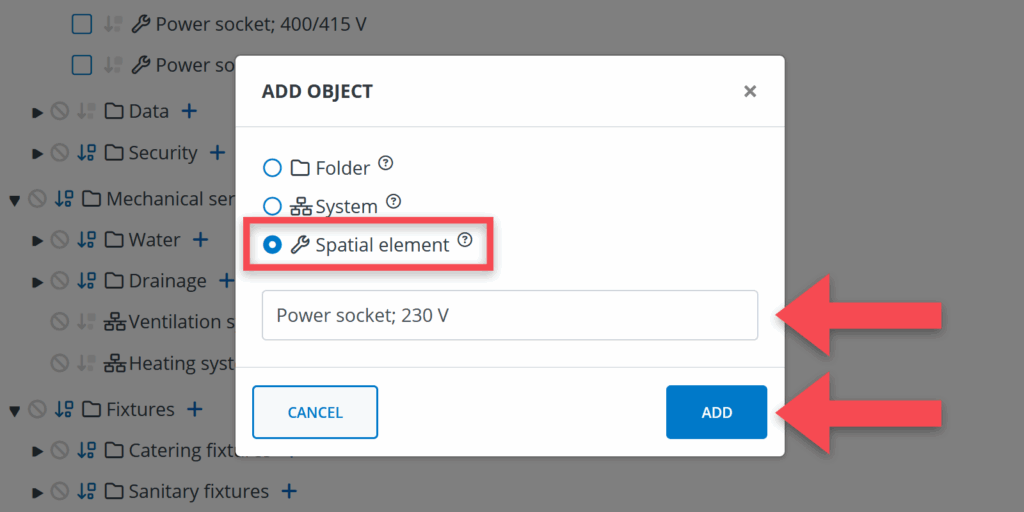
- Select Spatial element as object type
- Give the object a name (e.g. floor finish, glazed partition etc.) and click on Add.
Once you have created the relevant elements, you can link them to your spaces from either the element’s detailview (in the table Placement) or the spaces’ detailview (in the table Elements to be placed).
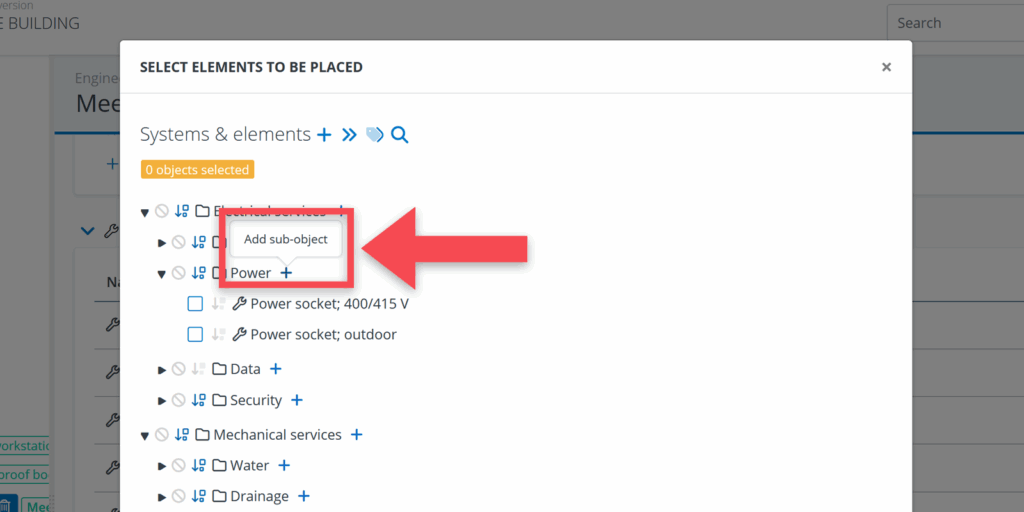
Method 2: in the selection window
The other method is to add the object during the process of creating the relation, directly from the space’s detail page. This method works best in situations where there are just one or two objects missing from the list.
Steps to follow:
- On the space’s detail page, scroll down to Elements to be placed.
- Click on the + Select / Add button to open the list of systems and elements.
- Click on the + button at the top of the list or next to a folder or system.
- Give the object a name and click on Add.
Use / functionality (optional)
As an optional module, you can add a block called Use / functionality to your room data sheet. This module allows you to define the intended use and functionality of spaces. This block consists of two tables (that can be added independently from one another):
- Users: the people or organizational units that will be using the space (e.g. visitors, employees, pupils, specific departments)
- User activities: the user activities that the space should facilitate (e.g. generic office work, focus work, meetings, teaching).

To activate this block, do the following:
- In the navigation menu, go to Settings > Project model > Modules
- Find the block called Use
- Select the trees that you are interested in.
- Go to those trees in the menu, under Requirements
- Create the relevant objects (i.e. user activities and users)
User equipment (optional)
User equipment concerns the equipment that will placed and used in a space by the space’s users in relation to their primary process.
This information can be useful for the design team in so far equipment items come with particular requirements. In a hospital, for example, a room may feature a CT scanner that needs a particular amount of power outlets. Likewise, a museum space may feature heavy art items that require extra load bearing capacities of the space’s floor.

Activating this tree goes in the same way as explained above, via the settings menu (Settings > Project model > Modules).
Related functionalities
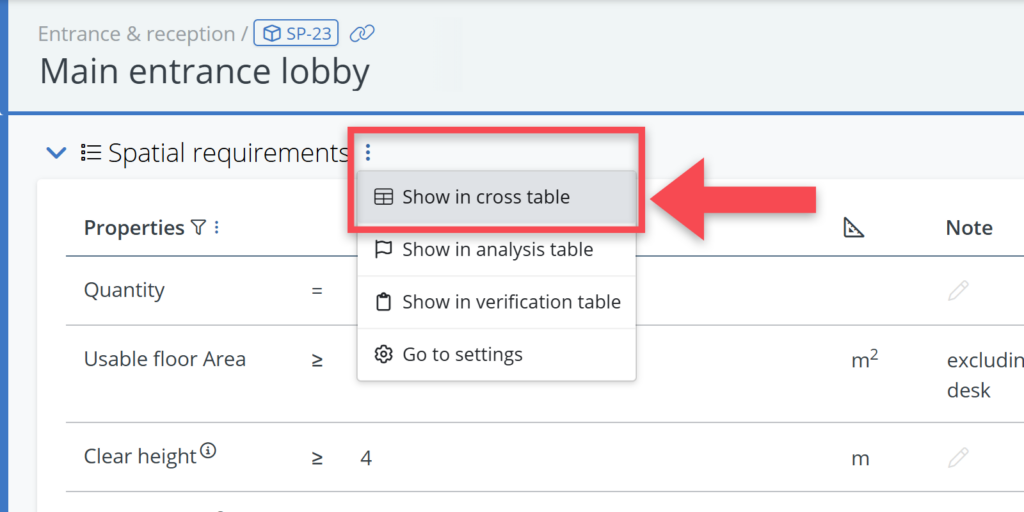
Cross tables
All the information that you add to a room data sheet in BriefBuilder, can also viewed (and edited) in an Excel-like cross table. You can, for example, easily make cross tables that show all the acoustic requirements of the defined spaces, or all the ceiling heights. See the example below.

The cross table functionality can be found via the navigation menu, under the header Overviews.
Area overview
A special kind of cross table is the area overview which shows all the spaces and their sizes and quantities. This is a crucial overview because it also makes a calculation of the total size of the project in terms of square meters (or square feet).

The area overview can be found via the navigation menu: Overviews > Quantities > Area overview.
Word report
It also worth mentioning that you create a Word version of your room data sheets.
Although it is our recommendation to give the entire project team access to BriefBuilder (because then they can search for data, make their own cross tables etc.), it can be that certain people prefer to have a Word version.

The report functionality can be found via the navigation menu, under the header Reports.
IFC integration
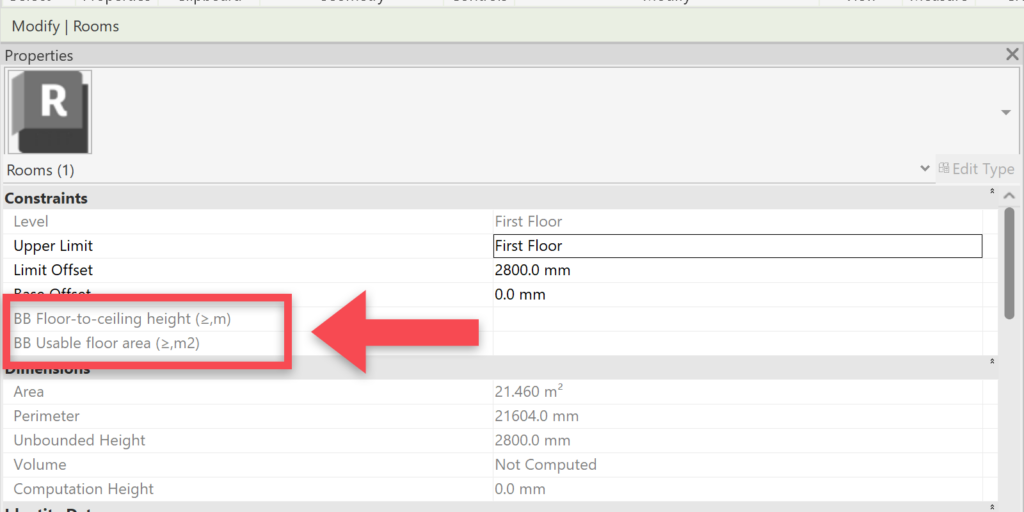
Once the design team has developed a design proposal, it will be interesting to match the spaces in their BIM model with the room data sheets in BriefBuilder.
This can be done in various ways, depending on the software that the design team is using.
Within the BriefBuilder application, it is possible to do this via an IFC integration. In that case, you ask the design team for an IFC export of their design model, which you can then upload in BriefBuilder. Assuming that the design team has used the same names (or IDs) for their spaces, the IFC model will automatically be mapped with the room data sheets.
Revit integration
For design teams working with Revit, we have created a dedicated add-in that they can use to ‘push’ the information of the room data sheets in BriefBuilder (the rooms themselves, their IDs, the related requirements) directly into Revit.
Templates
At BriefBuilder, we have several ready-made templates for room data sheets available. These templates come with an extensive set of possible properties and relations.
The templates are easily customizable can give you a quick start for making your own set-up.
At this moment, we have templates available in English (focused on UK), German and Dutch. Danish, French and Norwegian templates are in the making.
Contact your account manager or our support team if you would like to have access to these templates!