
In BriefBuilder, user roles determine which actions and information are accessible within the software. Roles are assigned at two levels:
- Environment roles: define what a user can do in the BriefBuilder environment and which project models they can see. These roles cannot be customized.
- Project model roles: define what a user can do or see within a specific project model. These roles can be customised for each individual project model.
Both types play an important role in managing access and permissions. The details of each will be explained below.
Looking to add new users to a BriefBuilder environment? Click here.
Environment roles
At the environment level, there are four fixed user roles:
- Project model user
- Project model creator
- Environment editor
- Environment administrator
Each role is explained below.
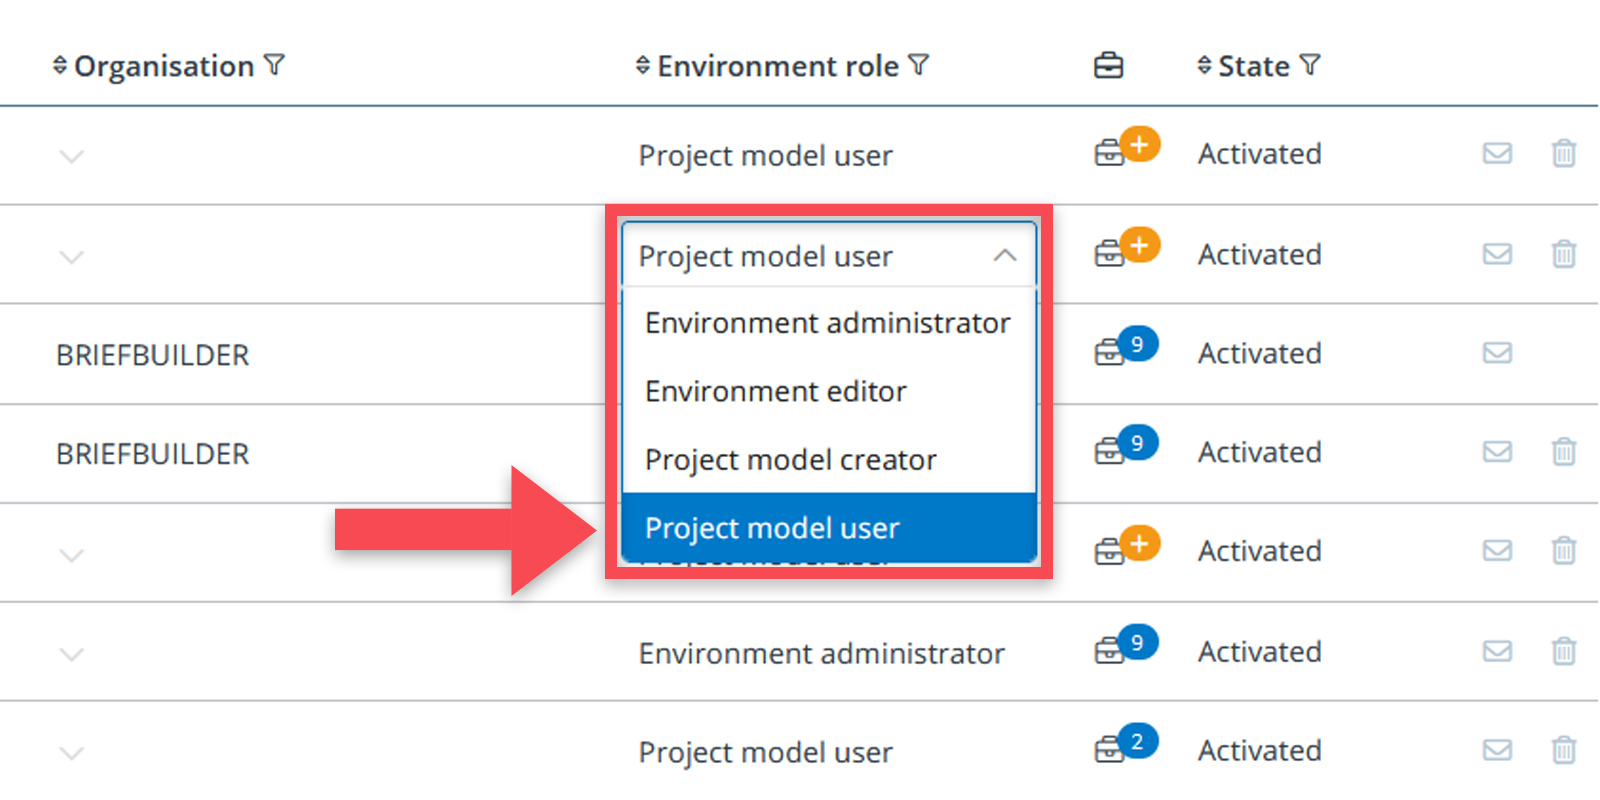
(1) Project model user
This is the default role that is assigned when a new user account is added. It is also the most commonly assigned role in BriefBuilder, as it is intended for users who need access to specific project models, such as architects or engineers working on a particular project.
Permissions:
- Access to one or more specific project models
(2) Project model creator
This role is intended for users who should be able to create new project models, without having access to the entire environment. It is typically assigned to project team members who do not require access to all models in an environment but still need the flexibility to start their own projects.
Permissions:
Same as the project model user, plus:
- Create new project models.
- Clone, delete, archive, and restore any project models they have created themselves.
(3) Environment editor
Environment editors can view all project models in an environment (also those of their colleagues), make clones of all project models, and create new project models. This role is typically assigned to users within the organisation who work with BriefBuilder on a regular basis.
Permissions:
Same as the project model user, plus:
- Clone any of the project models in the environment.
- View all project models in the environment (both active and archived).
(4) Environment administrator
Environment administrators can basically do everything and see everything in an environment. This role is typically reserved for the BriefBuilder “super users” within an organisation; It is a crucial role because it allows you to create user accounts and give access to project models.
Permissions:
Same as the environment editor, plus:
- Delete project models.
- Archive projects models, restore archived project models.
- View and restore back-ups.
- User management.
Project model roles
Each project model allows detailed control over which actions users are permitted to perform, such as creating requirements, adding comments or recording verification results. This is managed through project model roles, with each role consisting of a defined set of permissions.
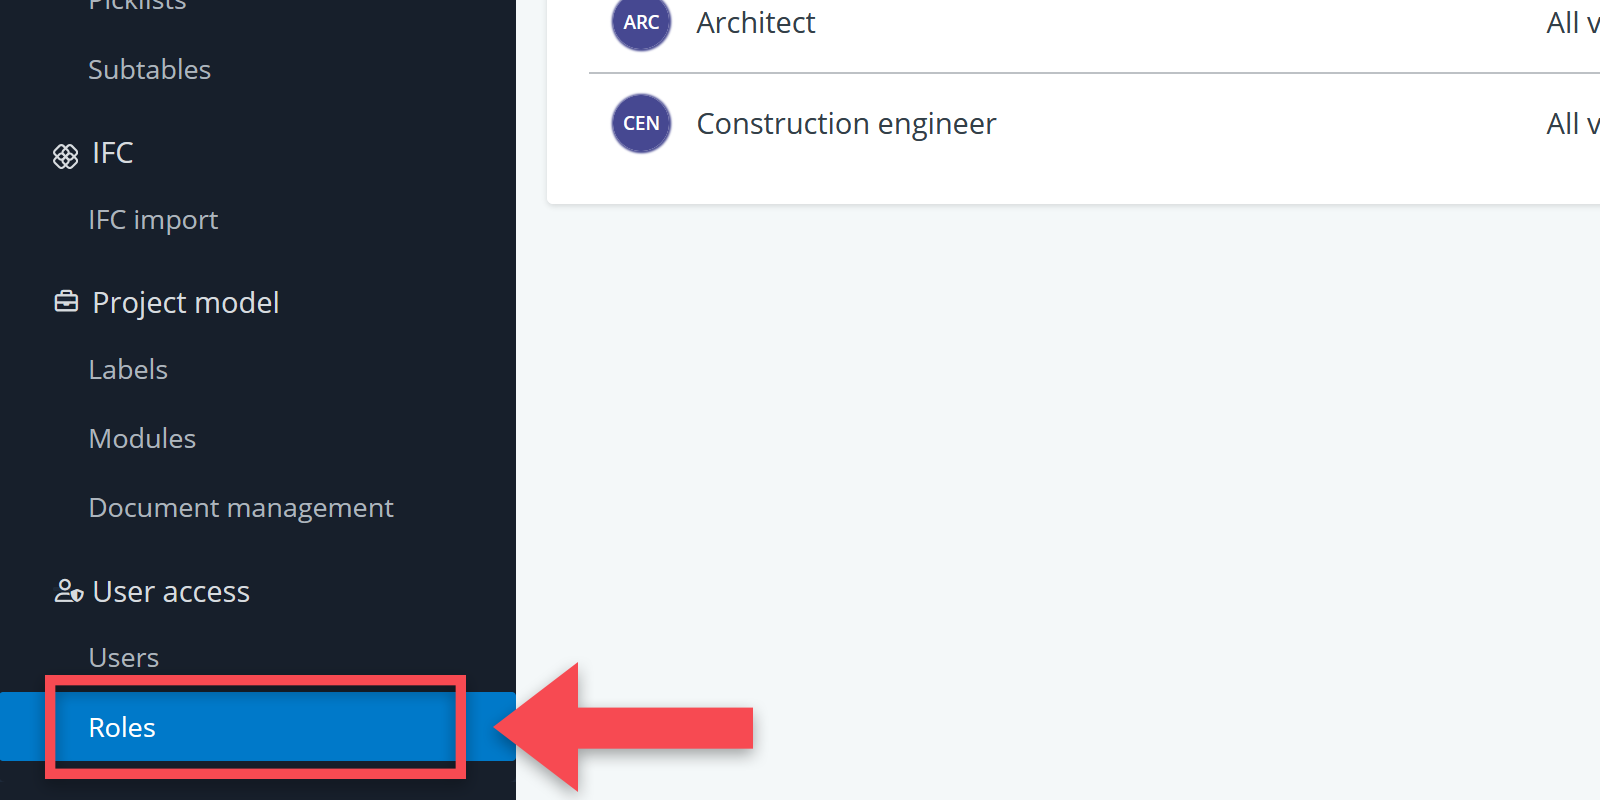
To define project roles, follow these steps:
- Open the Navigation menu (on the left side of the screen)
- Go to Settings (at the bottom of the menu)
- Look for the sub header User access
- Click on Roles
Adding / editing roles
In the Roles menu, you will find a set of default roles. You can easily add new ones by clicking on the Add role button, located next to the table’s header.

Once a new role is created, you can start defining its permissions.
The process involves two steps:
- Define which versions the role should have access to.
- Set the permissions for each functional area of the applications (e.g. requirements, analysis, verification).
Both steps are explained below.
Step 1: Defining version access
In the roles overview, you can specify to which versions a user should have access. There are three options:
- All versions (typically suitable for editors on the project)
- Published versions only (typically suitable for external parties during a tender)
- Working version and published versions (typically suitable for external parties, after tender)
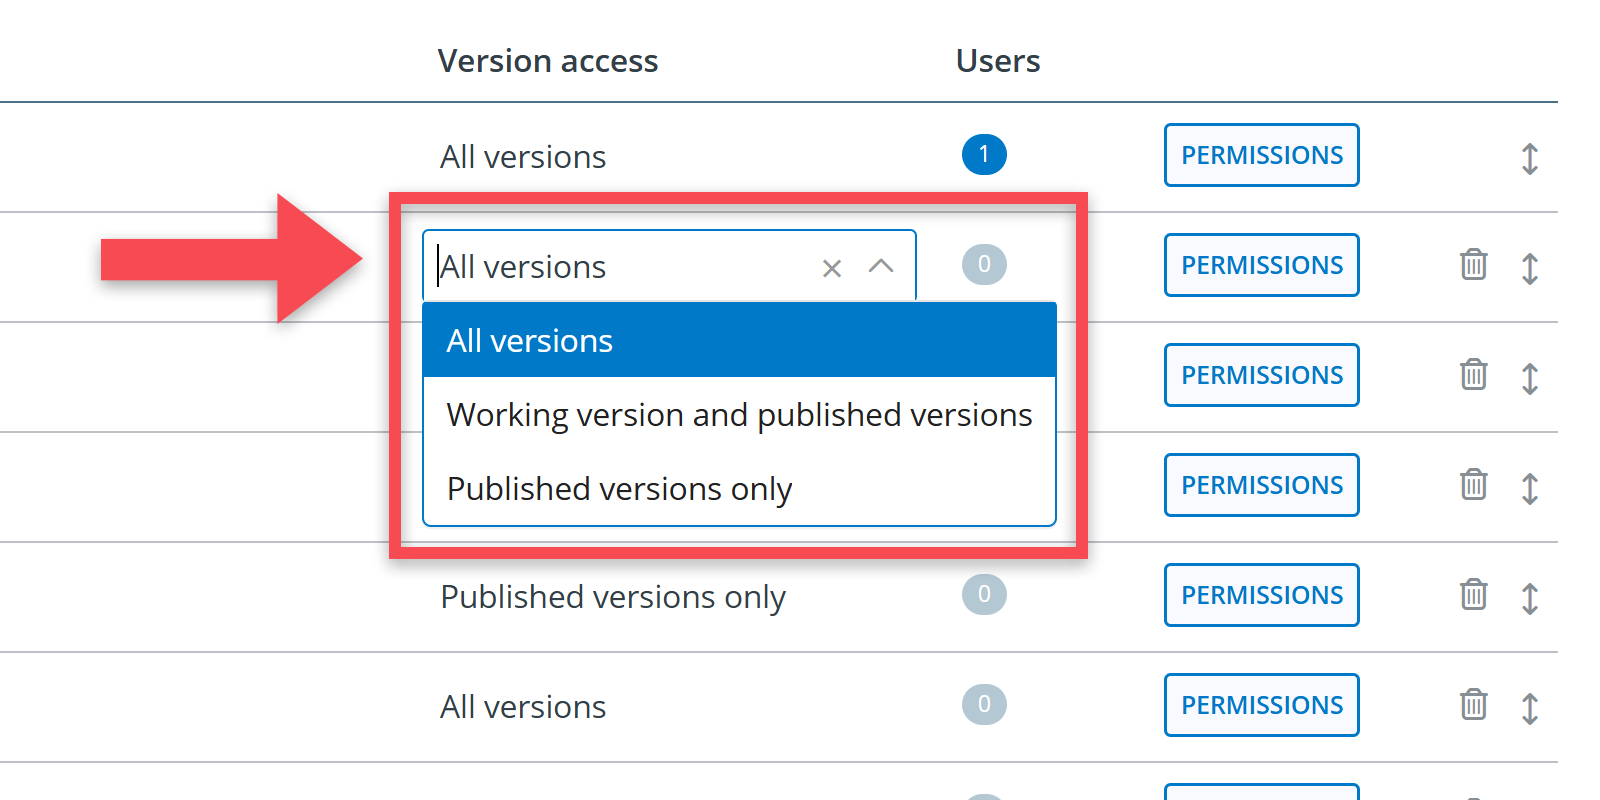
As explained here, published versions are the formally released, “frozen” versions of a model. If you select published versions only for a role, users with that role will not have any edit rights, nor will they be able to see non-published static versions.
If you choose All versions or Working version and published versions the user with that role will also have access to the working version, for which you can define specific edit rights (see step 2 below).
Step 2: Defining permissions per functional area
The permissions for each role can be defined and edited in the Permissions selection menu.
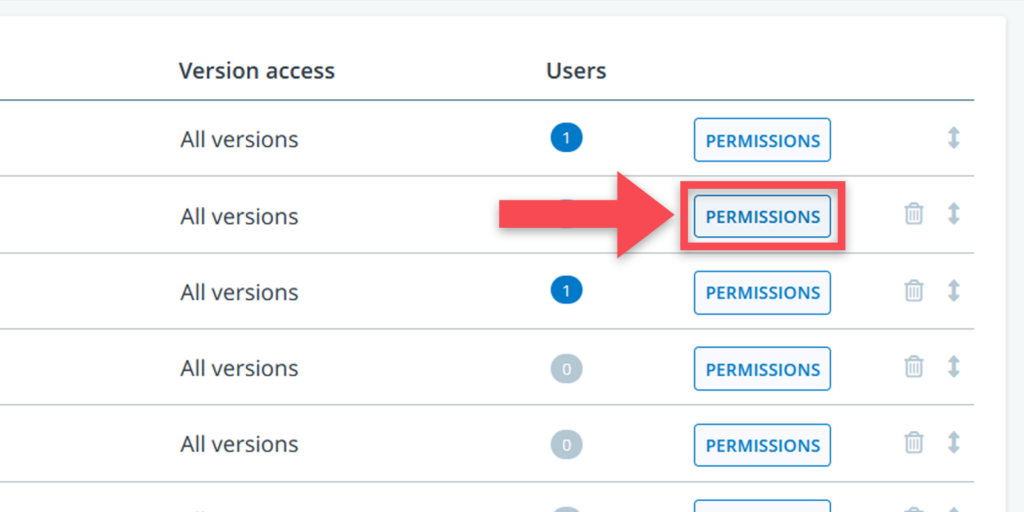
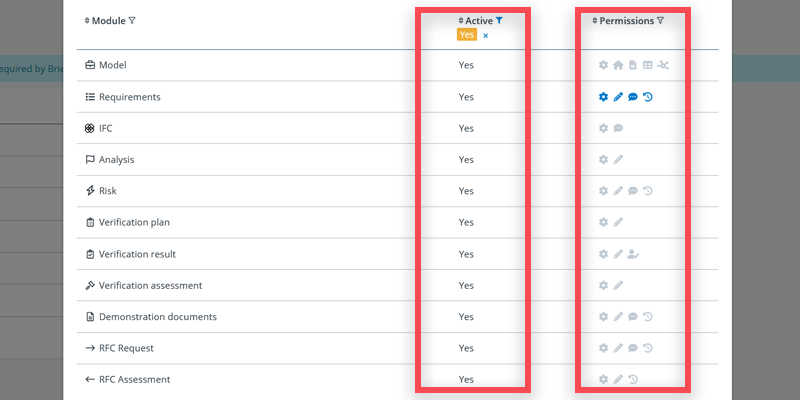
In the permissions menu, you will find all the modules organised into rows:
- Model (overall settings, i.e. project home, modules, roles, report definitions, table definitions, configure diagrams)
- Requirements
- IFC data
- Requirements analysis
- Risk (risk, action)
- Verification (plan, result, demonstration document, assessment)
- Request for change (request, assessment)
For every module, you can define different edit or viewing permissions by clicking on the icons. If an icon is blue, the permission is active. If it’s grey, the permission is inactive.
For most modules, the following options are available:
| Configure | Allows configuration of settings for that part of the model. |
| Edit | Allows editing of the data in that part of the model. |
| Edit assigned objects | Allows only editing of data that is specifically assigned to that user (currently only available for verification result). |
| Comment | Allows making comments in that part of the model. |
| History | Allows viewing the history of that part of the model. |
The permissions for Model differs from the others as it allows permissions of a different nature:
| Configure | Grants permission to activate modules, manage user access and define roles. |
| Edit project home | Allows editing of the project home page. |
| Edit report definitions | Allows defining standard reports. |
| Edit table definitions | Grants permission to edit table definitions, visible to all users. |
| Edit diagrams | Allows editing requirement diagrams, visible to all users. |
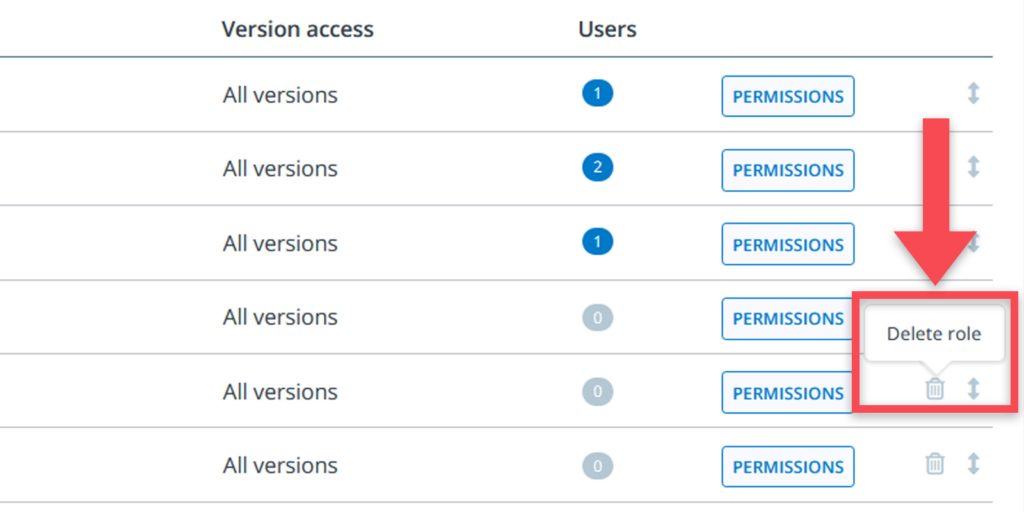
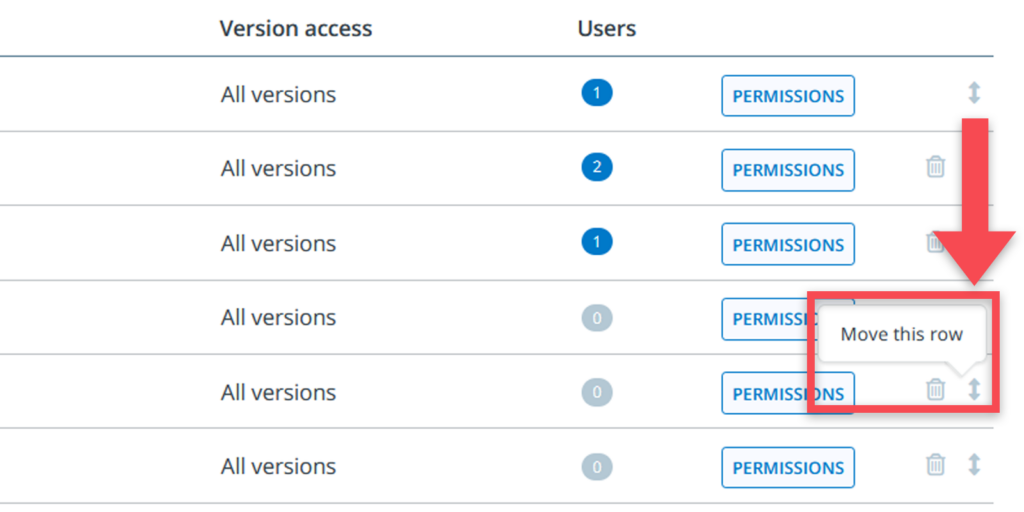
Deleting roles
Roles can be easily be deleted by clicking the bin icon at the end of the row. Rows can also be moved and rearranged (this is just for ease of use, there is no hierarchy to them, changing it does not impact permissions).
Default roles
In the default setup of BriefBuilder, the following project model roles are provided:
- Requirements manager: has full editing rights (maximum permissions).
- Requirements modeller: can edit requirements.
- Requirements reviewer: can perform requirements analysis.
- Verification manager: can develop a verification plan.
- Verification executor: can enter verification results for verifications assigned to them, their organisation, or their role.
- Verification assessor: can assess verification outcomes.
- Viewer – comments: can only make comments.
- Viewer – published versions: cannot edit any data; can only view published versions.
This is the default setup, but it can easily be modified. The only fixed role that cannot be deleted or modified is Requirements Manager.
Fixed roles
There are two fixed roles in BriefBuilder that cannot be altered: one with maximum permissions and one with minimal permissions.
(1) Requirements manager
This role comes with maximum permissions and is typically assigned to the person responsible for the model setup and overall requirements management.
Permissions:
- Configure permissions for all of the project model settings.
- Edit permissions for all of the project model modules.
- User management on project level.
- Manage comments.
When creating a new project model, the user automatically receives this role as the creator of the model.
(2) Viewer – published versions
This role comes with minimal permissions. The user cannot edit anything and only view the formally published versions of the project model.