A verification plan (sometimes also referred to as a test plan, control plan or commissioning plan) is a plan that explains how the verification process should/will take place in order to demonstrate compliance with the defined requirements for the project.
A verification plan typically answers the following questions:
- Which requirements will be verified?
- When will requirements be verified?
- How will they be verified?
- By who will they be verified?
To develop a verification plan in BriefBuilder, you first have to define the overall set-up (phases, methods, roles and outcome categories). After that, you can fill in the plan for your requirements. Both steps will be explained in this article.
Overall set-up
Setting up the verification plan begins with defining the following attributes:
- Verification phases (when should requirements be verified?)
- Verification methods (how should requirements be verified?)
- Verification executors (who should do the verifications?)
- Verification result categories (what are the result options?)
All four are explained below
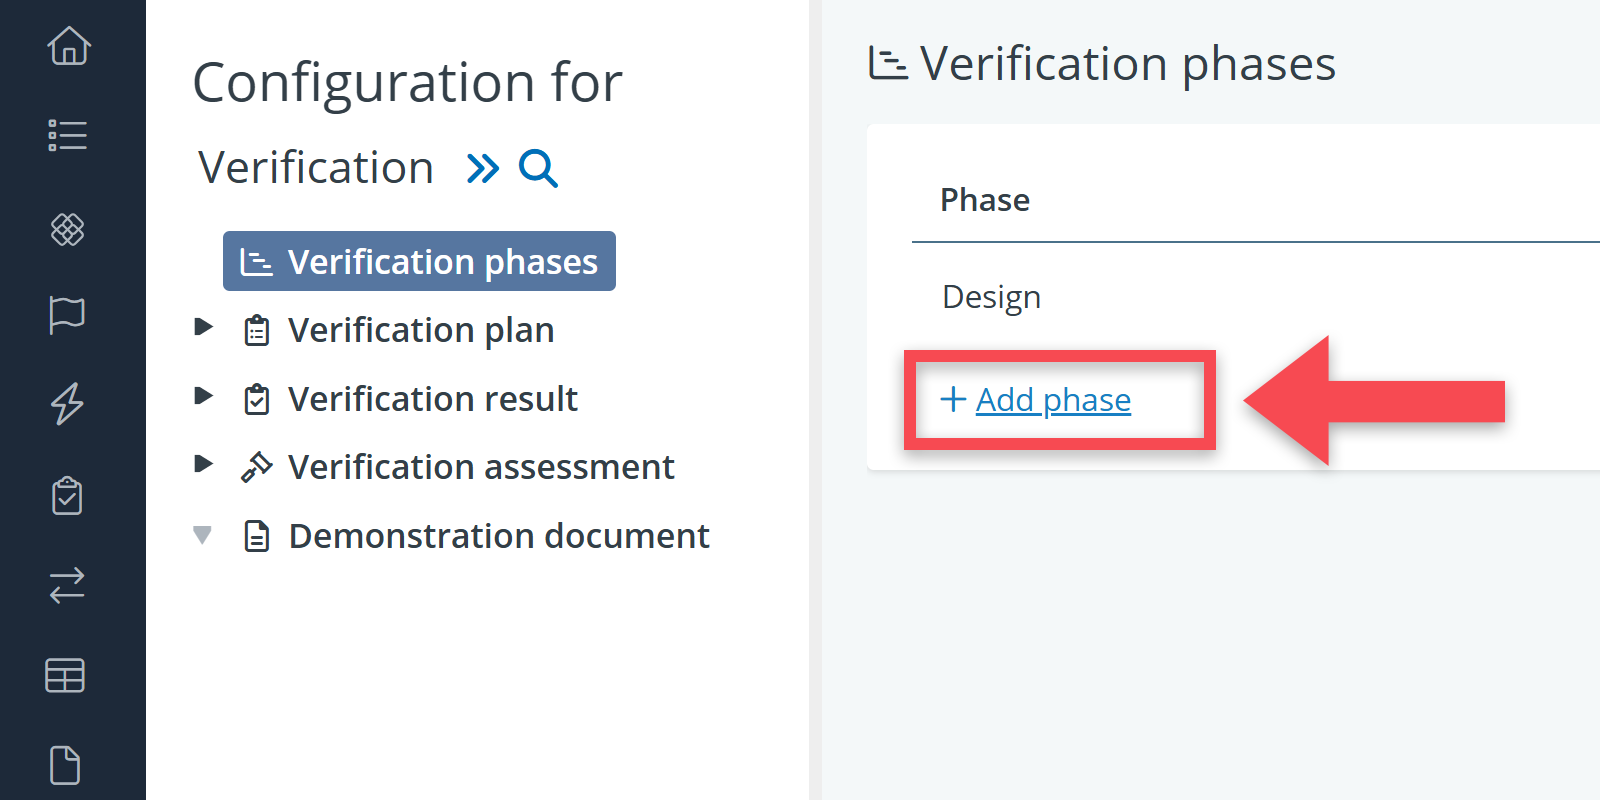
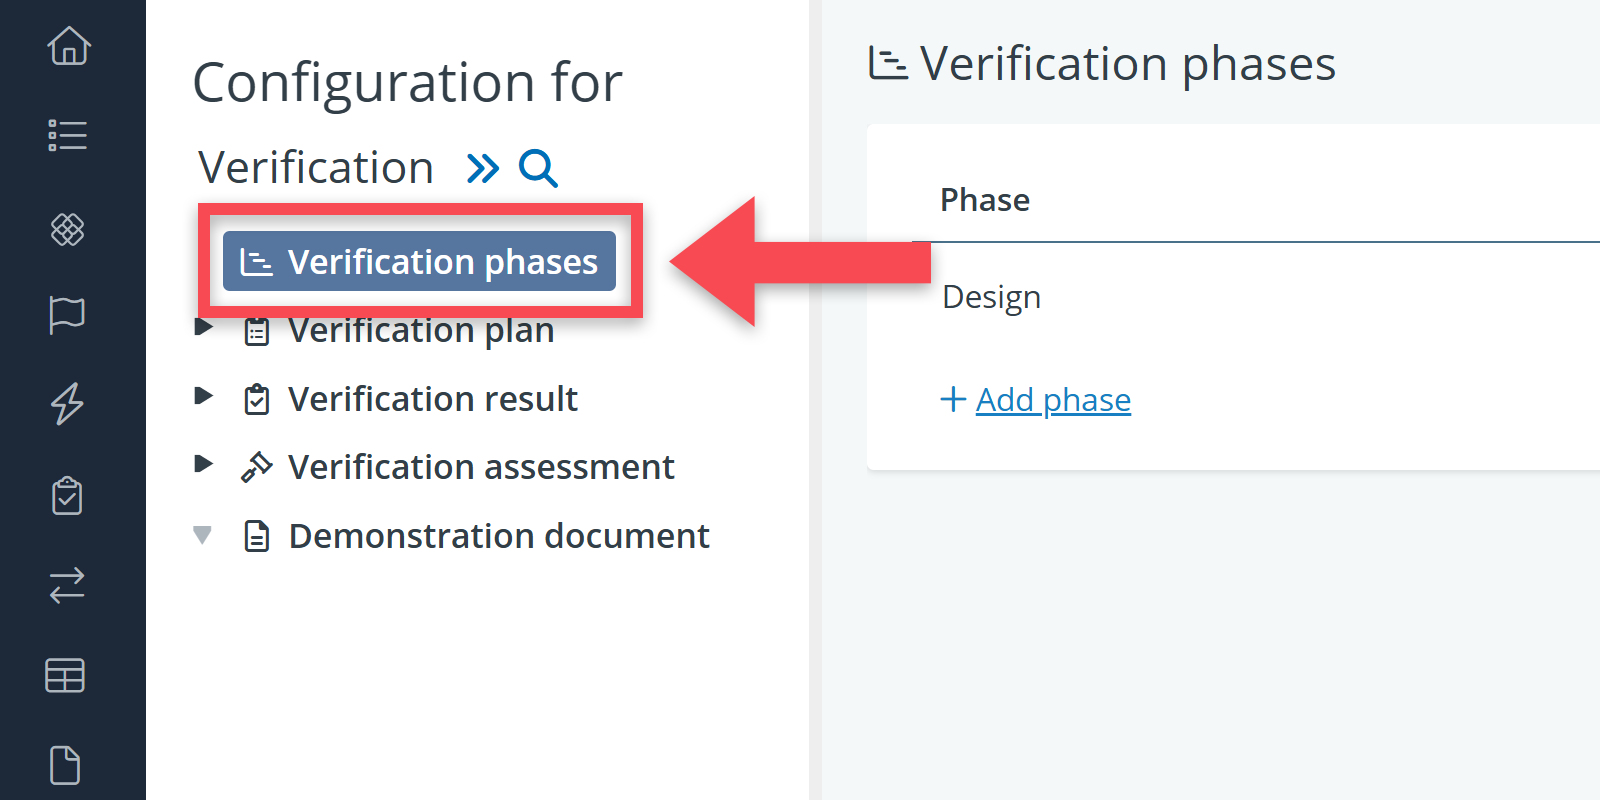
(1) Verification phases
To define when a verification should take place, you can create verification phases in BriefBuilder.
To define verification phases, head to Settings > Attributes > Verification and then click on Verification phases. There, you can add phases by clicking on Add phase.

(2) Verification methods
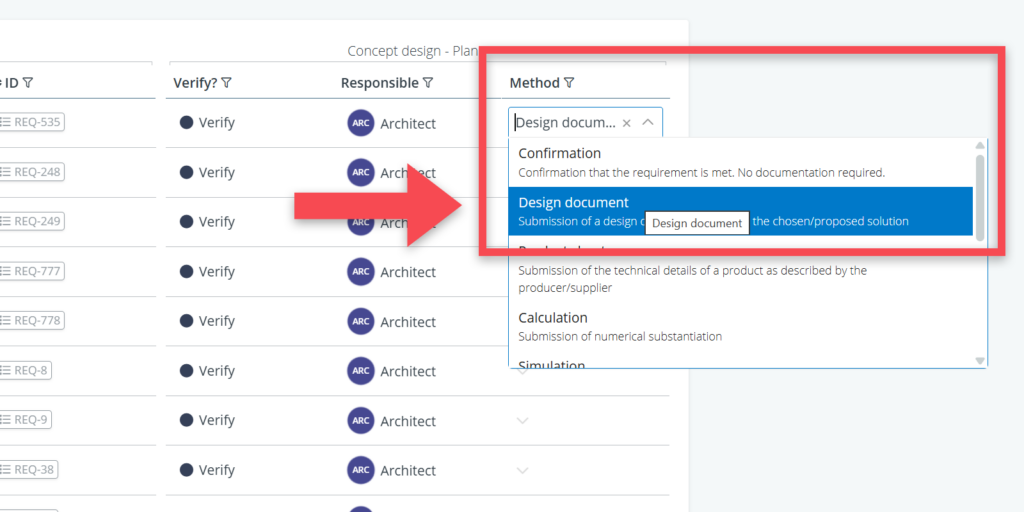
You may also want to define how a verification should be performed. Examples of verification methods are document review, visual inspection, simulation and performance test.
A method can also simply be confirmation, which means that the contractor or design team has to confirm that they are compliant without further documentation, which may be sufficient in the early phases of a project.
To define verification methods, you have to head over to: Settings > Attributes > Verification. In the settings tree, select Verification plan and then Properties.
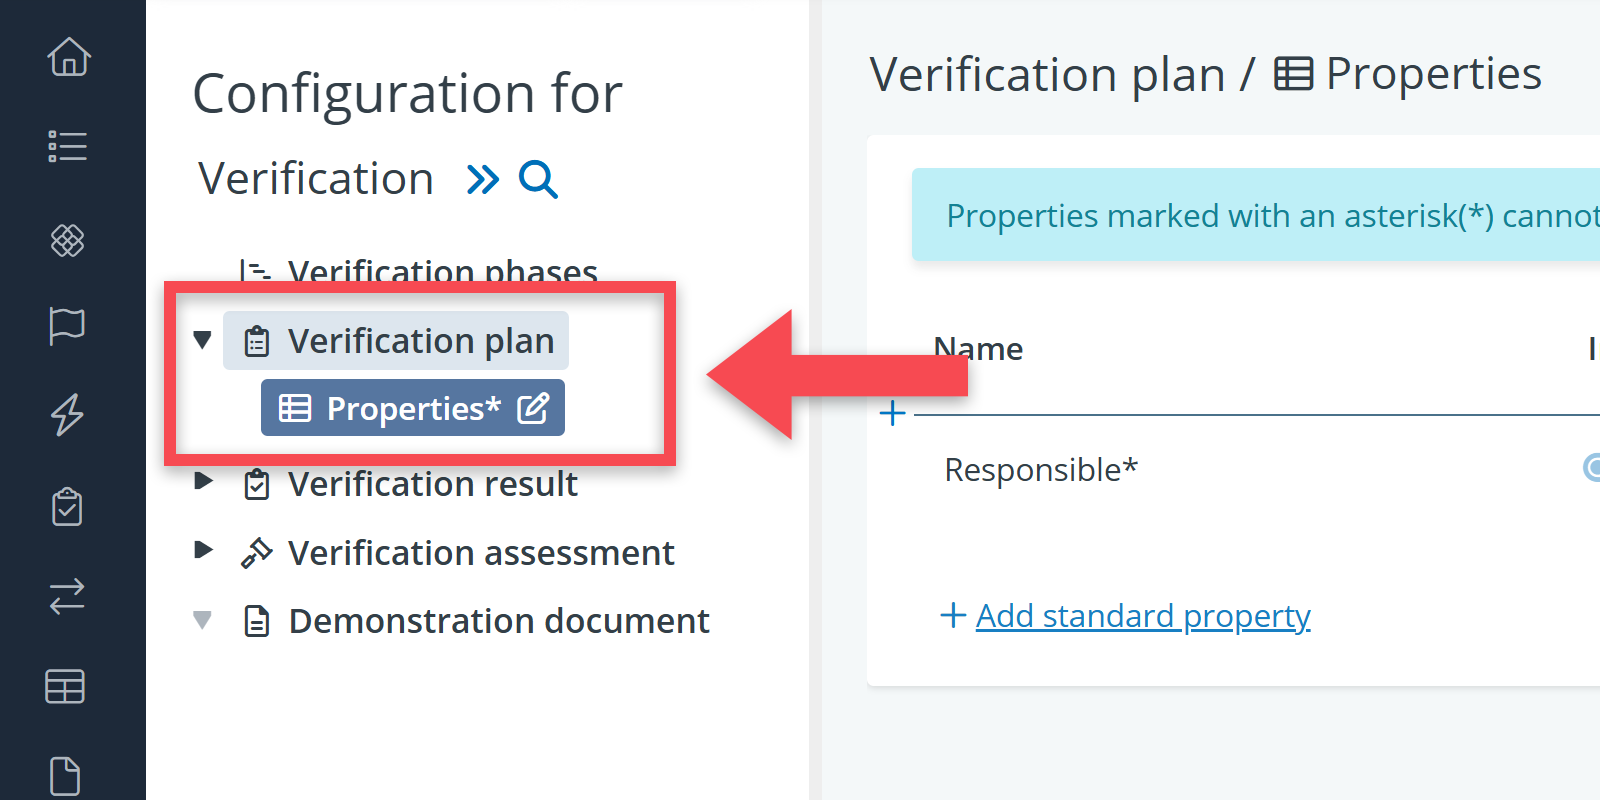
On the detail view of the properties table, you can create a property (in this case to be called Method) by clicking on + Add standard property.
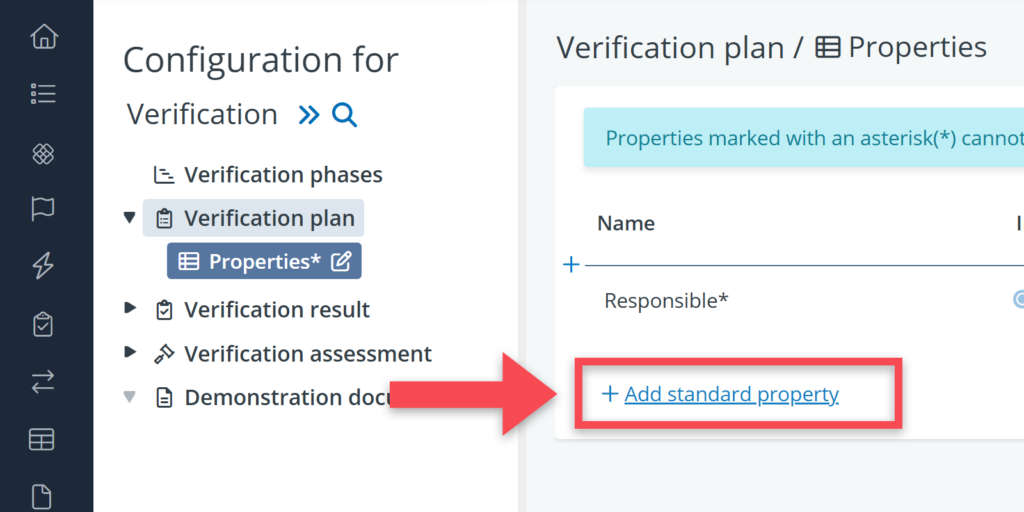
You have to set the input type to Picklist and click on the Picklist value field to add a number of predefined methods.
Note: you can also add a description for every individual picklist option (the methods, in the screenshot below).

Click on the Picklist value Field to be able to add or edit the available methods.
Once you have defined the relevant methods, these will show up in the verification table as a drop-down menu in the column Method.
(3) Verification executors
For reasons of accountability, it is important that there is a person or party that is responsible for a verification. Verification plans in BriefBuilder have therefore a default property Responsible.
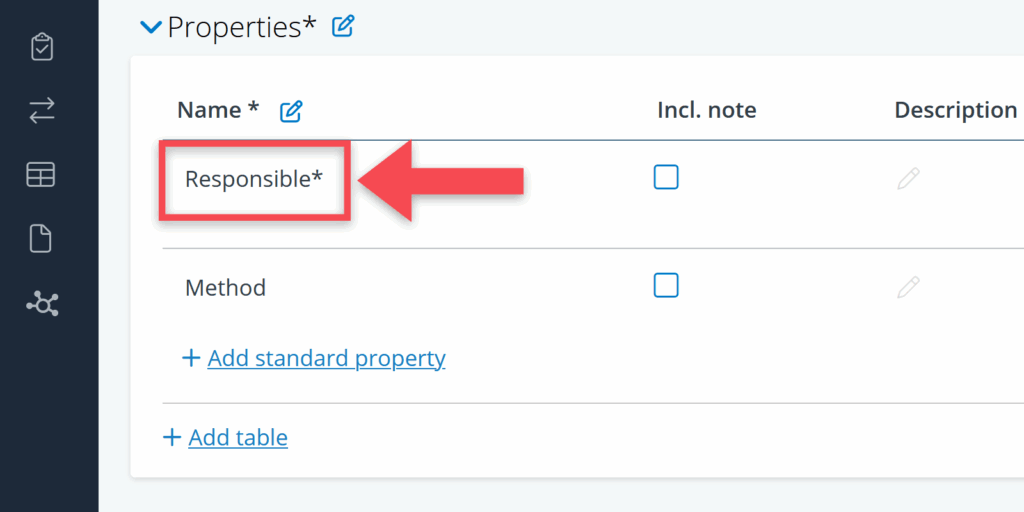
This property enables you to assign the verification of requirements, per phase, to:
- Users (specific persons who are registered as BriefBuilder users for your project)
- Organisations (e.g. Architecture firm A or Contractor B).
- Roles (e.g. architect, engineer, indoor climate consultant)
When assigning verifications to users you have to make sure that their accounts are linked to the right verification roles and permissions.
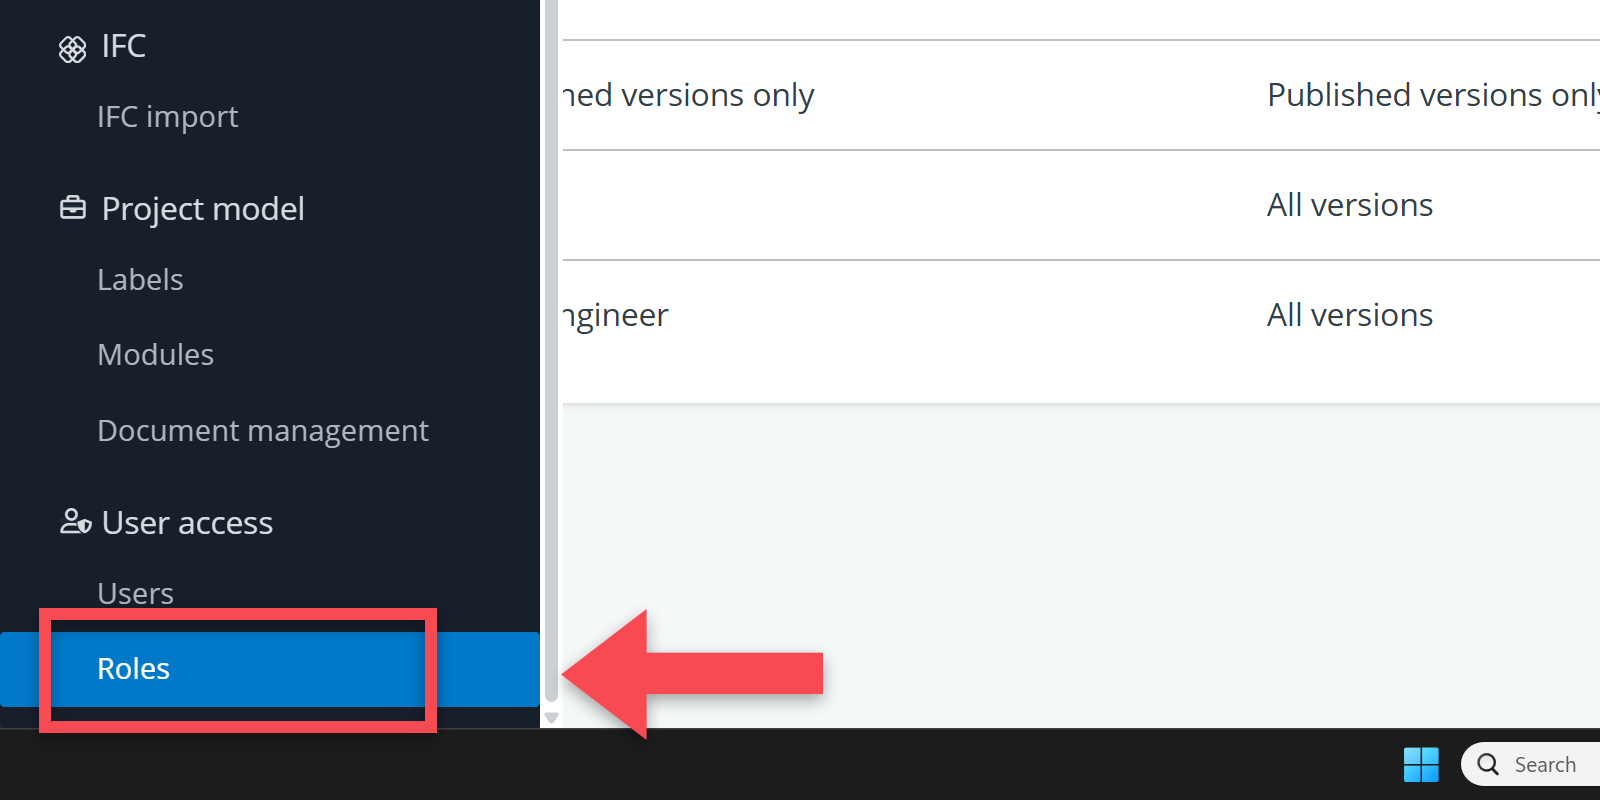
When the specific persons and organisations aren’t known yet, you can choose to assign verifications to roles (e.g., architect, supplier, contractor etc.). These roles can be added via the roles menu:
Go to Settings > Project model > Roles.
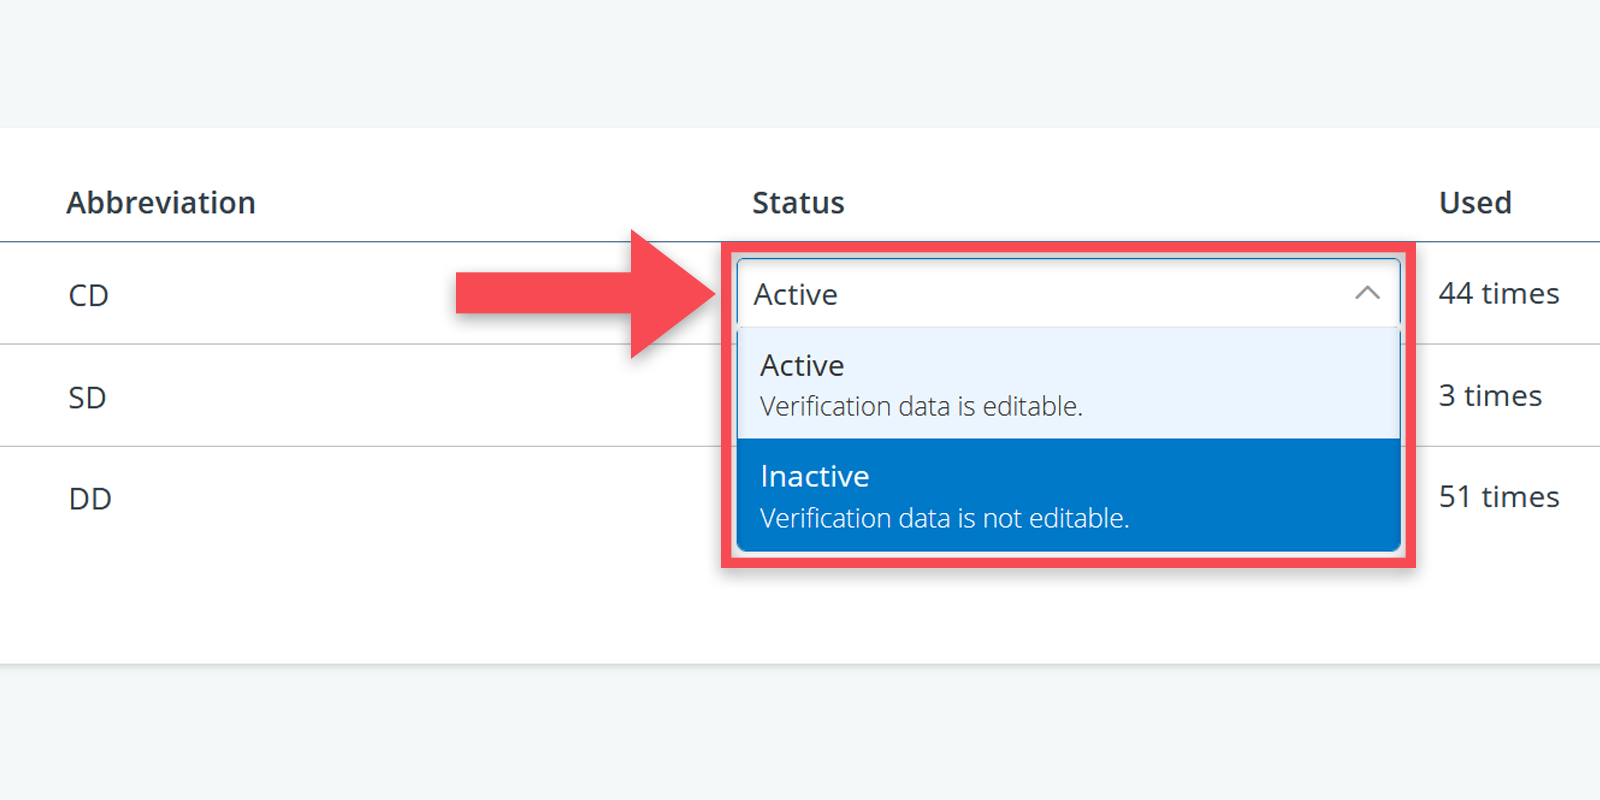
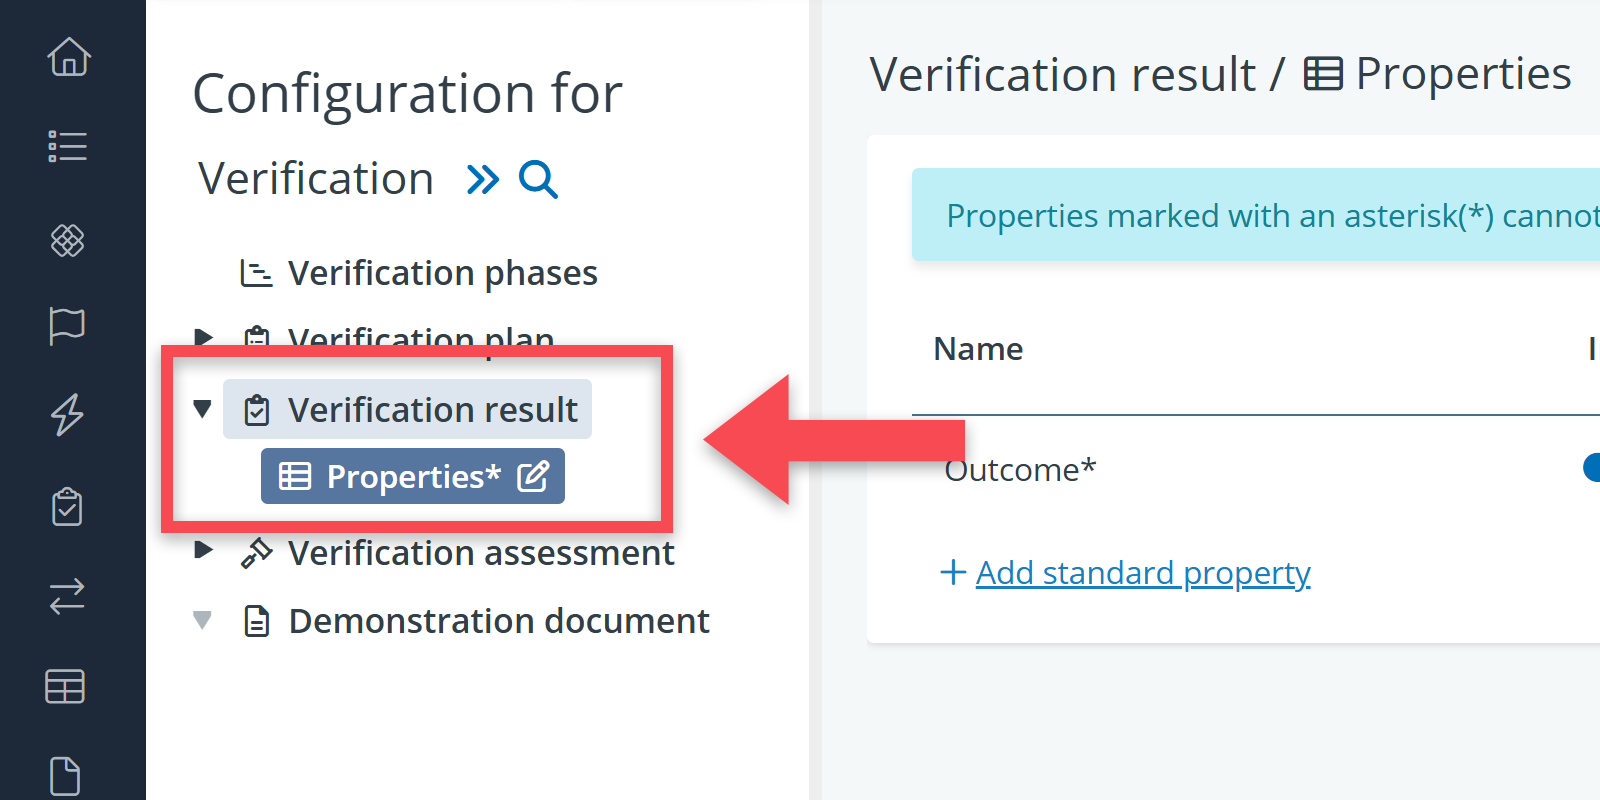
(4) Verification result categories
The different outcome possibilities for verification results can also be part of setting up your verification plan. By default, BriefBuilder provides the following outcome options for verifications:
- Compliant
- Partially compliant
- Non-compliant

You can easily edit these categories via the Settings menu. You may, for example, want to add an outcome option called Not yet verifiable or Deviation accepted.
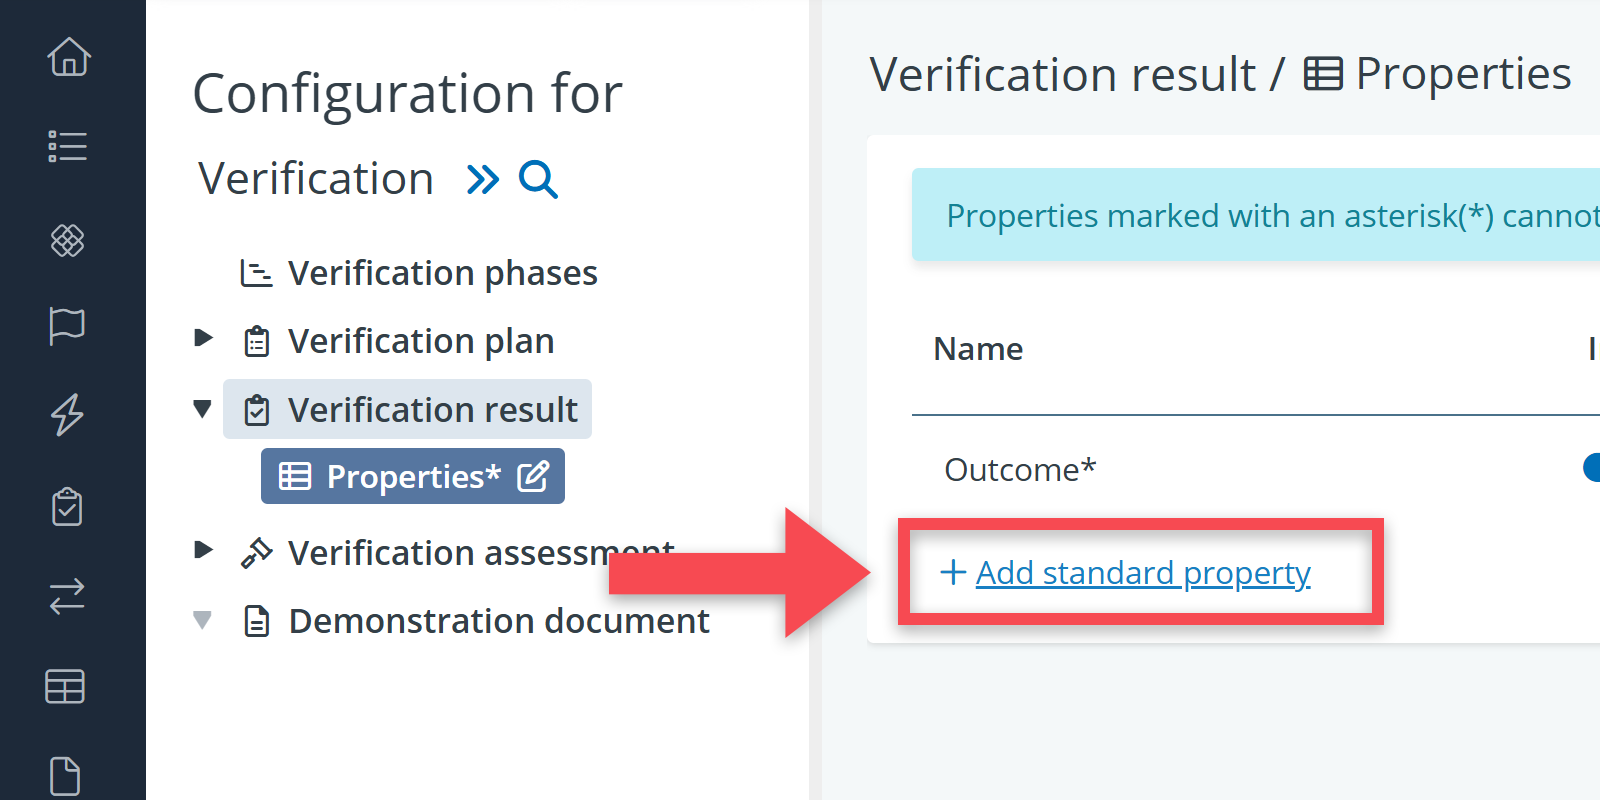
To define and edit verification result properties, you have to go back to Settings again and click this time on Verification result in the settings tree.
To change the outcome categories, click on the Picklist values field for the property Outcome.
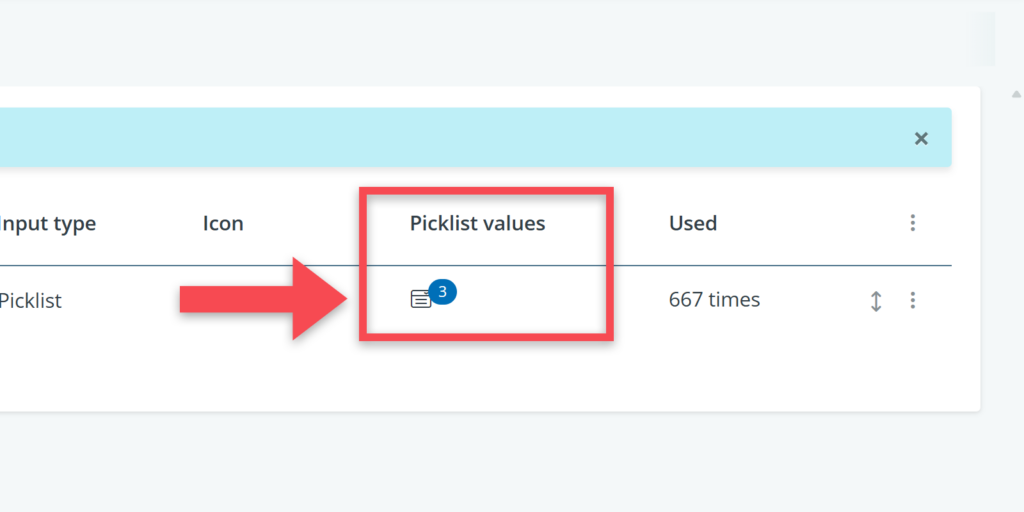
If you want to add a new property, click on Add standard property. Set the input type to Picklist if you want to have a drop-down menu.
Making the verification plan
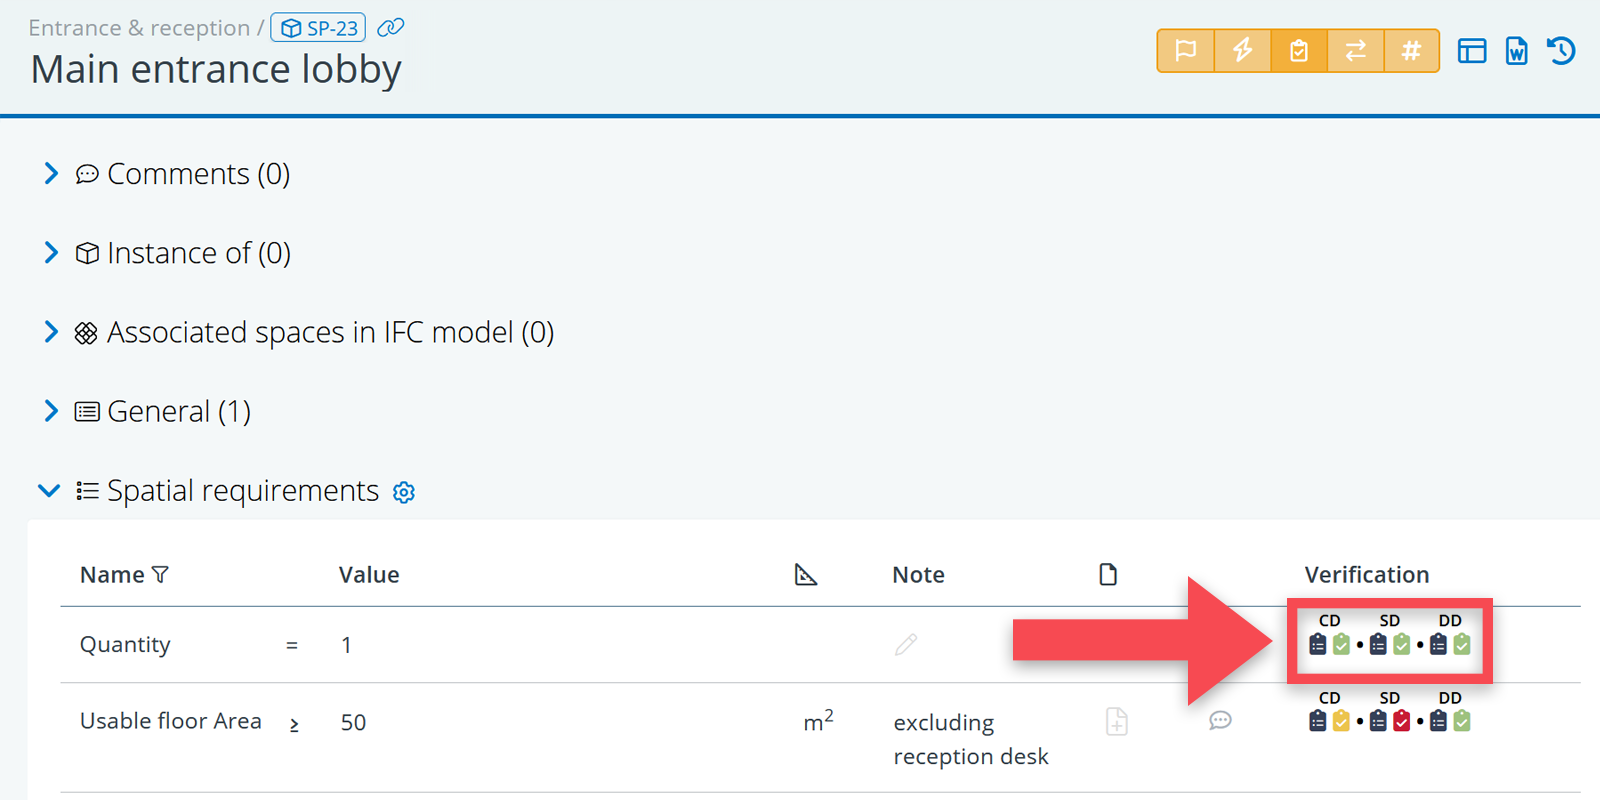
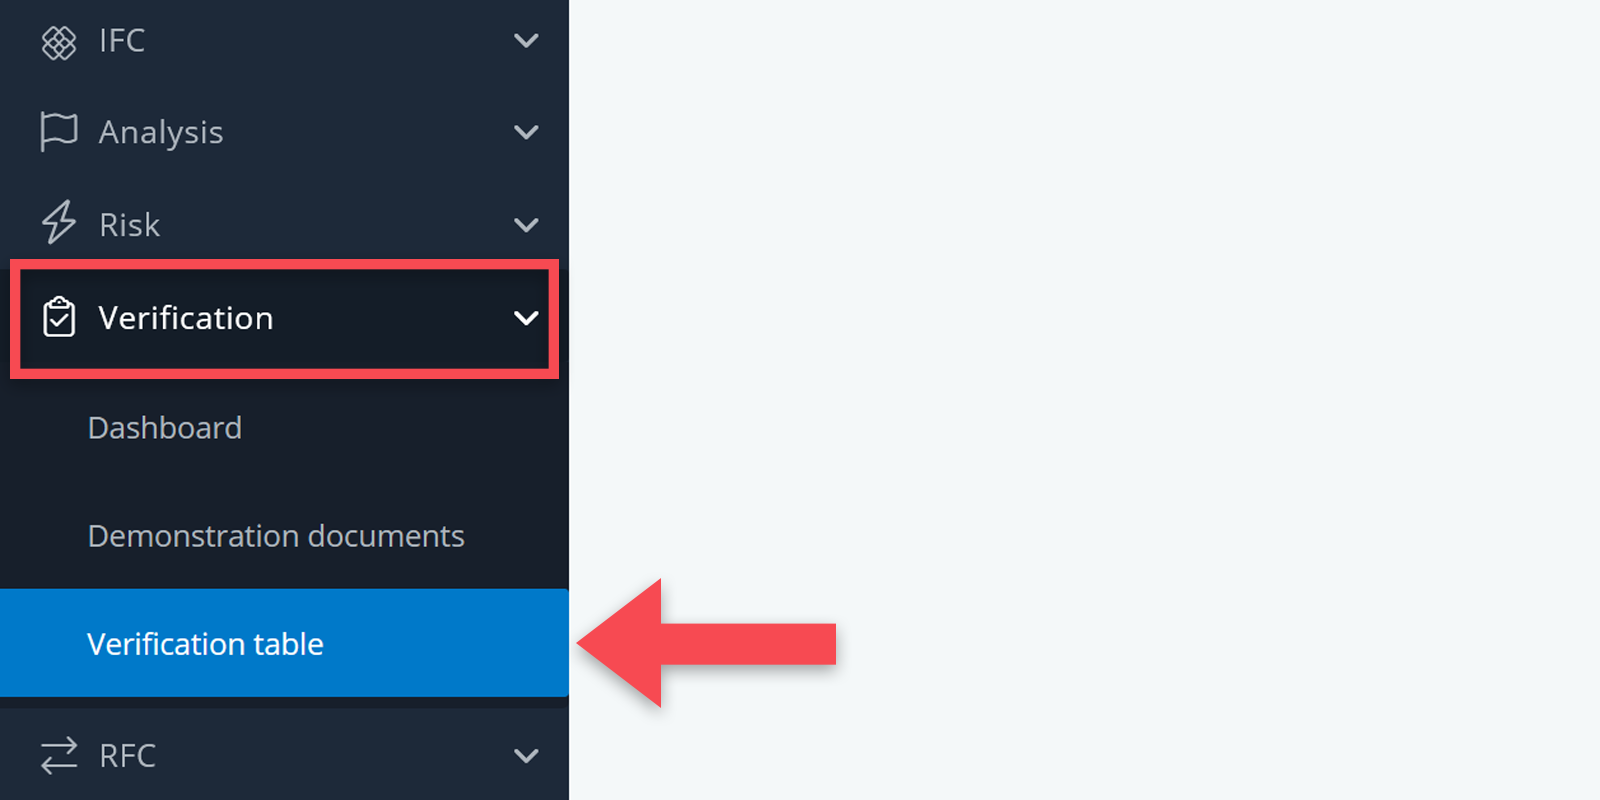
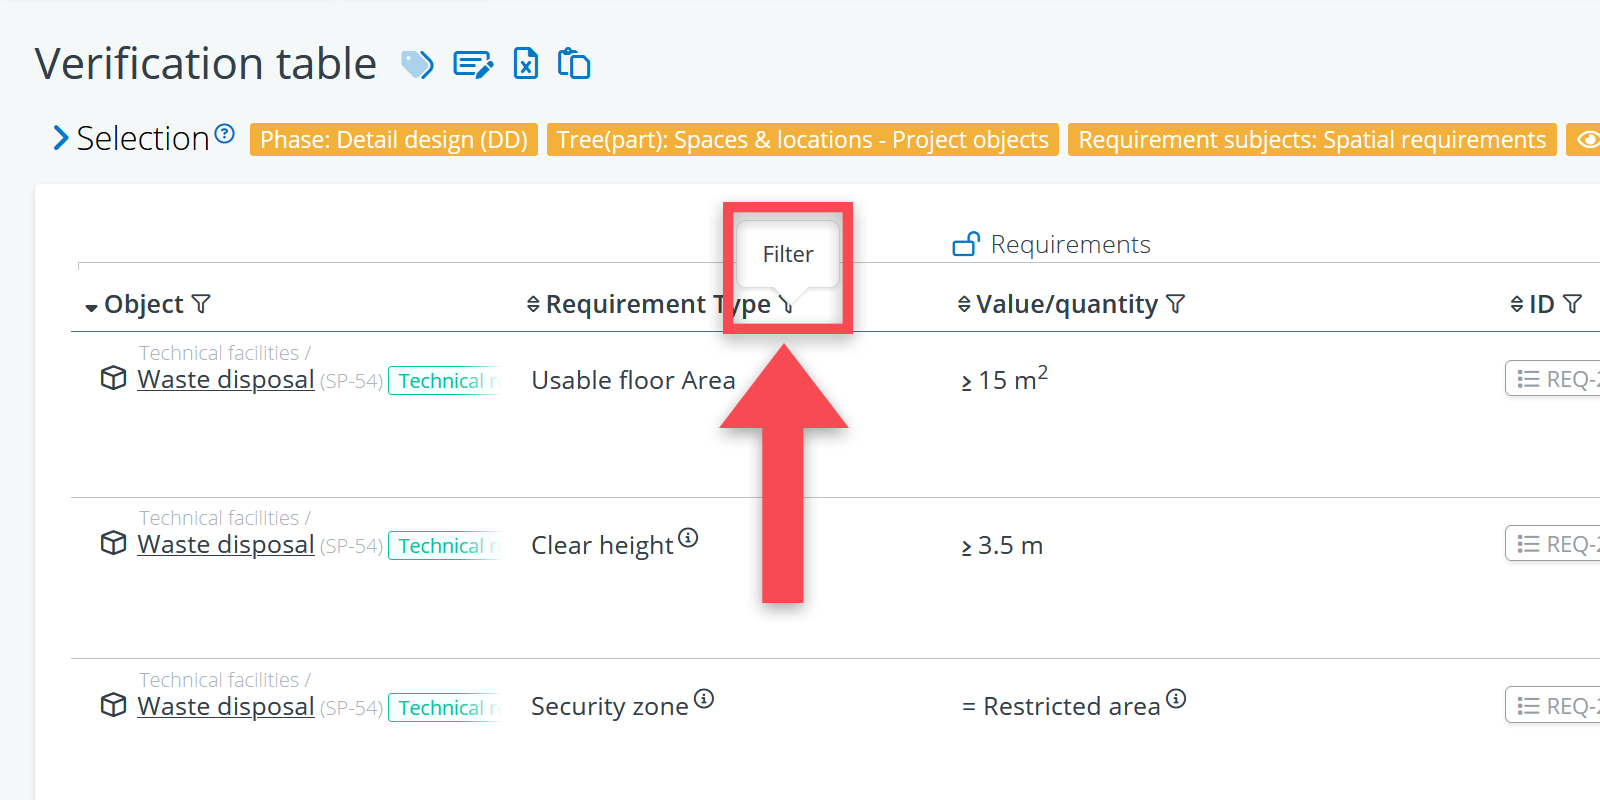
Once you have defined the overall set-up, you can start creating the actual verification plan. For this, it is best to use the verification table. In this table, you are able to find all the requirements plus all the related verification data. By using various filters and selections, you can step-by-step create your verification plan.
You can find the verification table in the navigation menu, under Verification.
To create a new verification plan, you have to click on New + in the selection window, after which you will see a selection window with the following possibilities:
Selections for requirements
When making the plan, you can use these selections to select a particular group of requirements (e.g. all requirements for a particular system or specific standard property blocks).
- Tree: the tree or tree part that your set of requirements is part of (e.g. Spaces & Locations).
- Object type: relevant when interested in a particular object type (e.g. only Spaces).
- Labels: relevant when looking for requirements that related to objects with a particular label (e.g. Renovation).
- Requirement subject: relevant when looking for a particular type of or group of requirements (e.g. all acoustic requirements).
- Aggregate: an option to show requirements data in an aggregated modus, based on your selections.
Selections for verifications
These selections concern the available verification data. When starting with the verification plan, these selections will still be largely empty. Along the way, however, you will want to use them to check your plan by searching for verifications that e.g. still lack a responsible party or method.
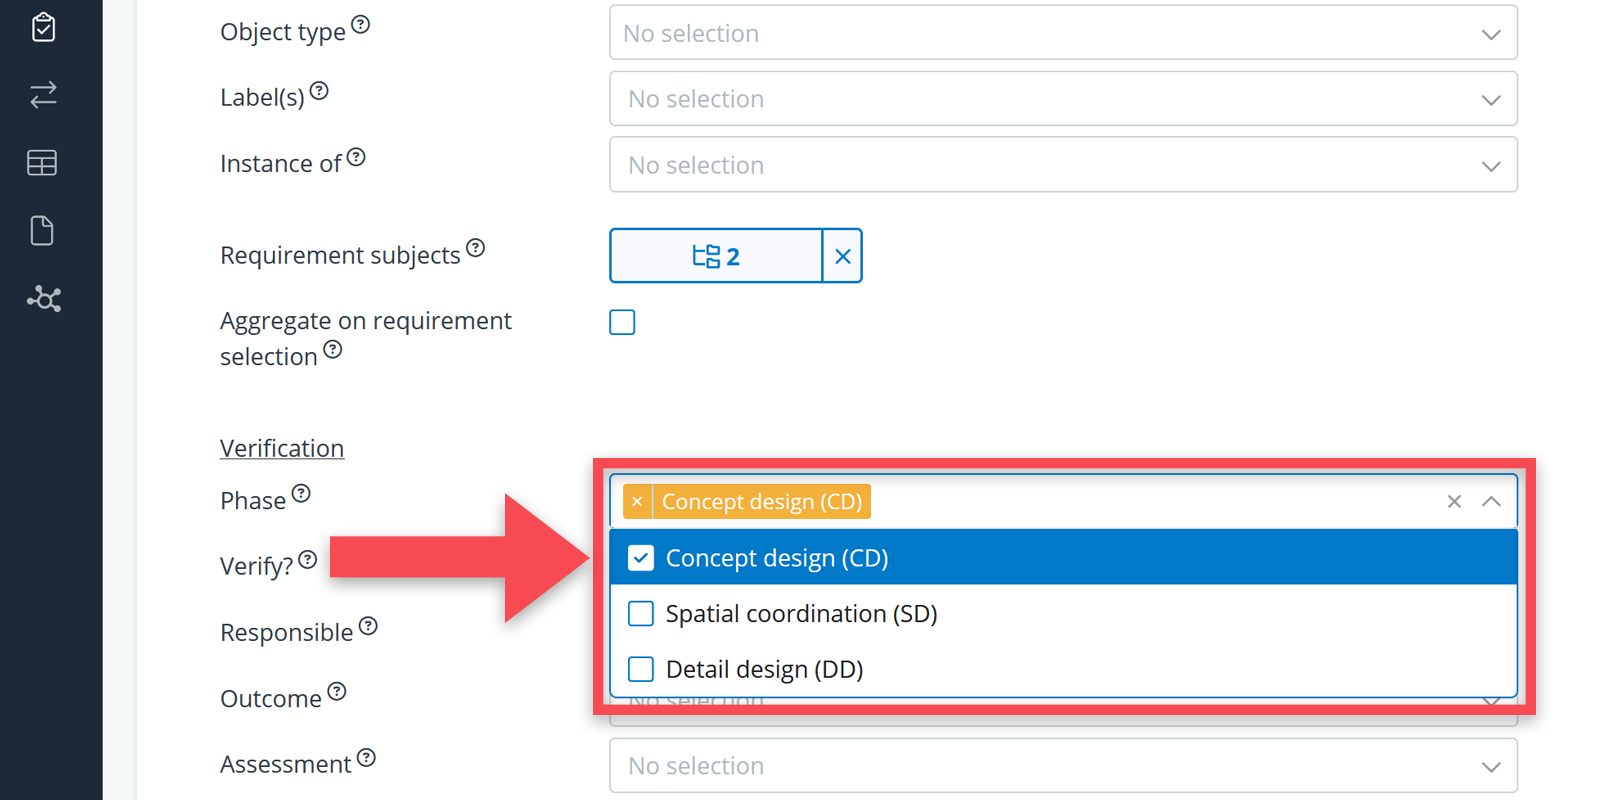
- Phase: relevant when wanting to define verifications for a particular phase.
- Verify?: relevant for selecting requirements that should be verified (= Verify) or not (= Don’t verify), or requirements for which this hasn’t been determined yet (= Empty)
- Responsible: relevant for finding verifications that haven’t been assigned yet.
- Outcome: relevant for verifications with a particular outcome (or lack thereof).
- Assessment: relevant for when verification outcomes have been assessed (only if this module is activated).
- Demonstration documents: relevant when interested in the verifications that have been tied to a specific demonstration document (again only relevant if this module is activated).
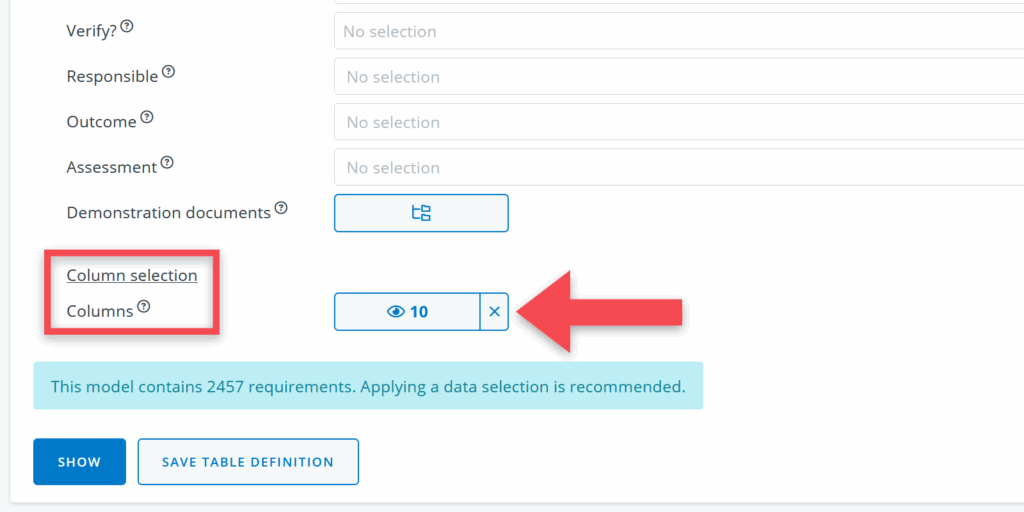
Column selection
This selection allows you to determine which columns you want to see in the verification table. When making the verification plan, you won’t yet need to see the verification result columns. When unselecting those columns, you’ll have a better overview in your table.
Using these selections, you can step-by-step create a verification for different groups of requirements, e.g. starting with making the verification plan for al the spatial requirements, then for all the indoor climate requirements, then for the electrical installations and so on. Below, we’ll explain this process by means of a simple example.
Creating the plan: an example
Let’s use a simple example for explaining how you can create a verification plan for a specific set of requirements. Say that, in a building project, you want to make the architect responsible for the verification of room sizes and room quantities, and that the verification should take place during concept design, by means of a design document.
You can do this in three steps, as we’ll explain below.
Step 1: Define the overall set-up
As we explained in the beginning of this article, the first step is to create the overall set-up for your plan in the settings menu. In this example, we have to make sure that there is a phase called Concept design, a method called Design document, and a role called Architect.
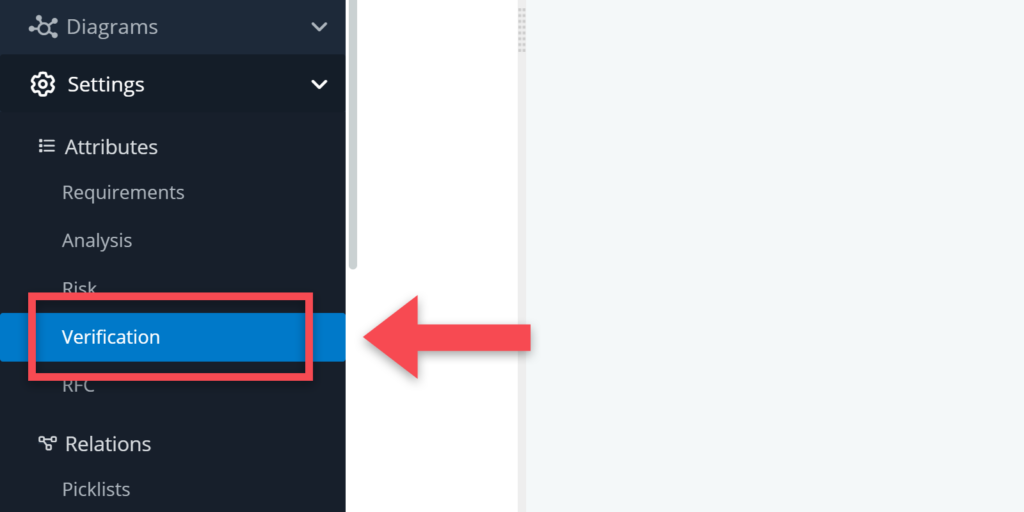
To create the phase Concept design:
- Go to Verification in the Attribute settings menu
- Click on Verification phases
- Create a new phase called Concept design
To create the verification method Design document:
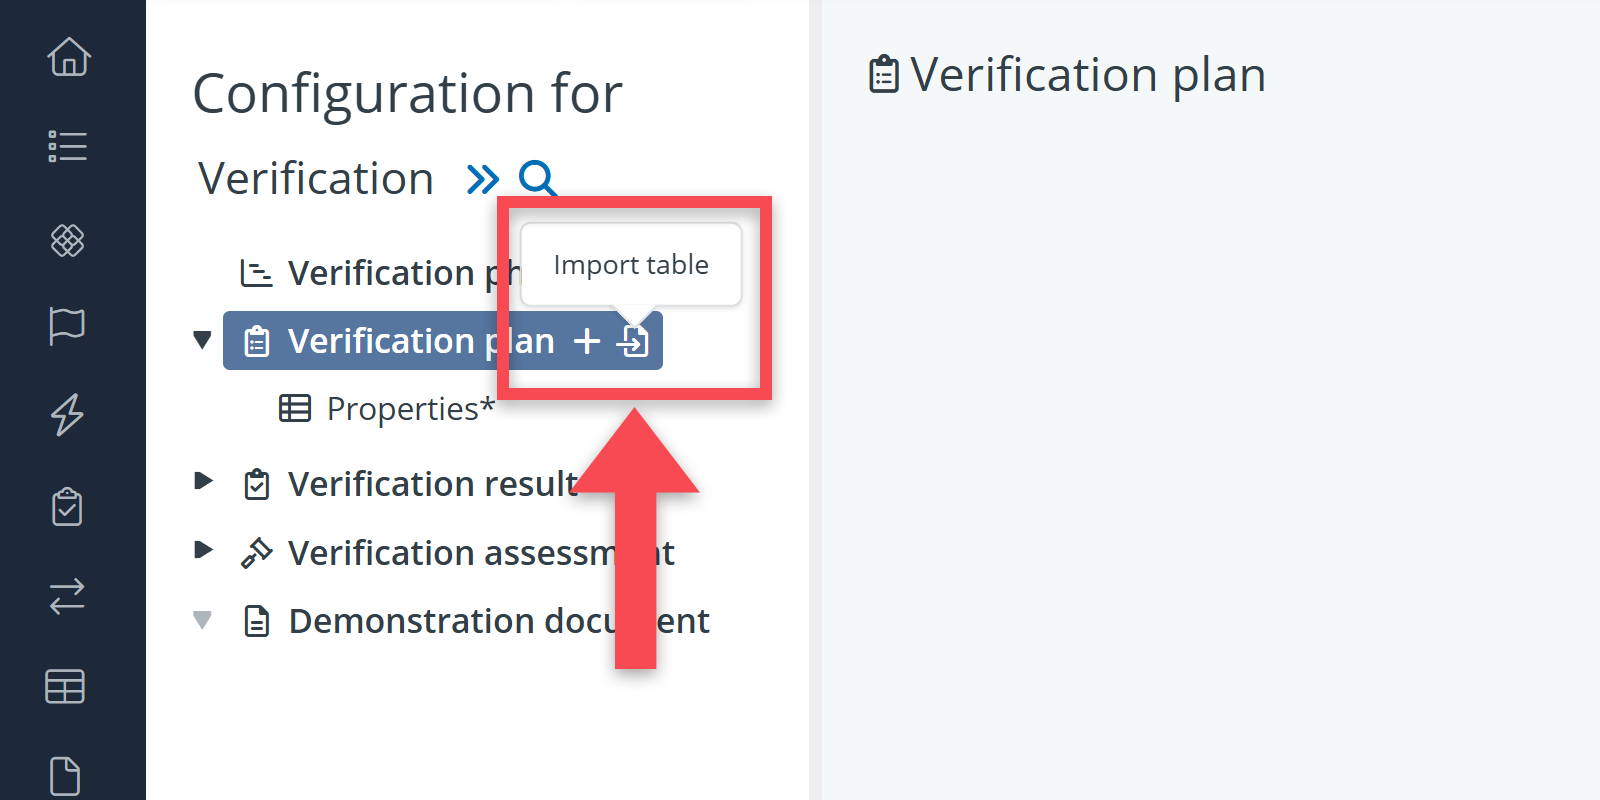
- Stay in the verification settings, but now click on Verification plan
- Create a new property called Method and select picklist as input type
- Create Design document as a picklist value.
To create the role Architect:
- Go to Roles in the settings menu
- Create a new role called Architect
- For this role, click on Permissions and enable the edit permission for verification result.
Once you defined the appropriate settings it is time to go the verification table.
Step 2: Select requirements in verification table
To select the requirements for which you want to add a verification plan, go to the verification table in the main menu. Click on New + and select the relevant requirements.
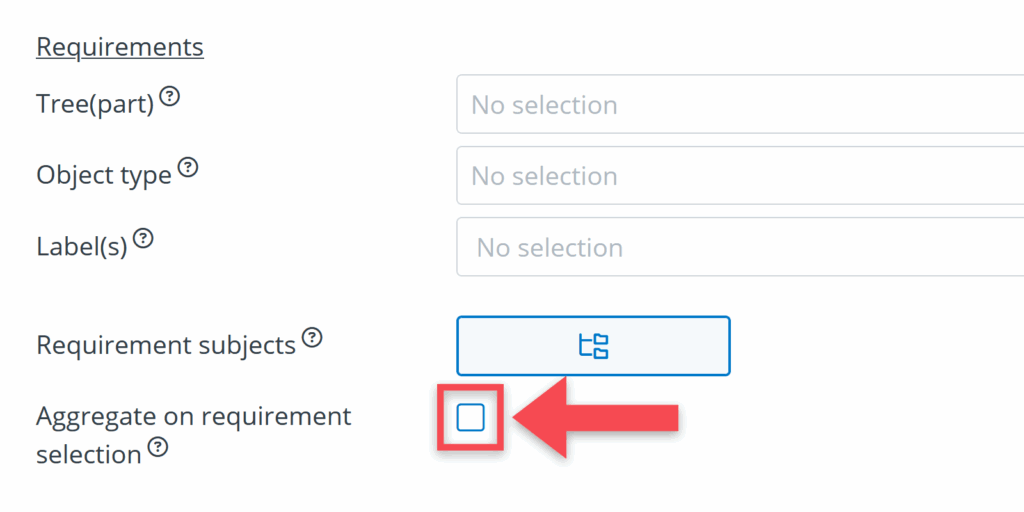
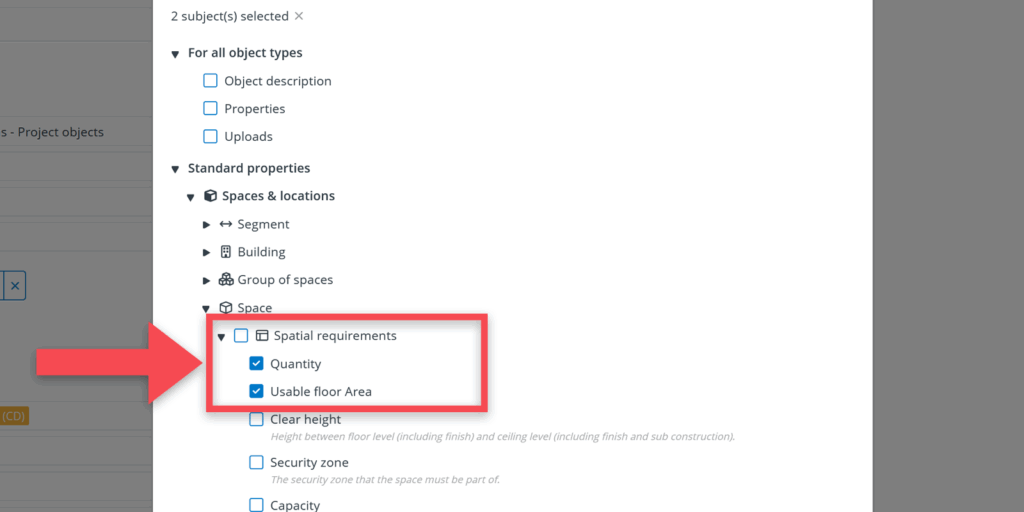
Requirement selections
- Select the tree Spaces & locations.
- Optionally, select the object type Space.
- Most important: go to Requirement subjects and select quantity and floor area, which can be found under standard properties.
- Recommended: also check the box aggregate if you do not want to see all the individual requirements, but just your selections.
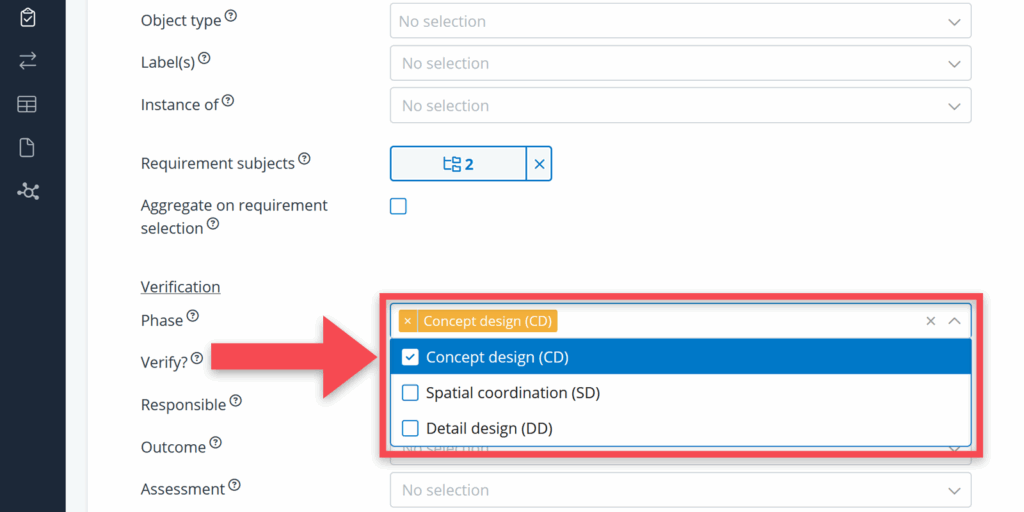
Verification selections
In this example, there is no need yet to use these selections because there are no verification data yet. Optionally, you can choose Concept design as a phase to keep your table simple.
- Go to the Phases, and select Concept design.
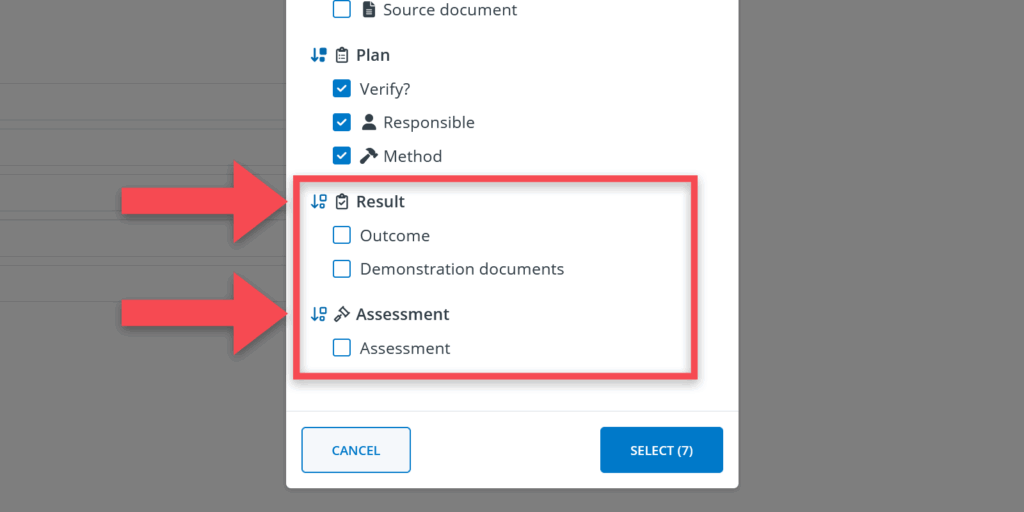
Column selections
Because you are making a verification plan, there will be several table columns that you aren’t interested in yet (i.e. the columns for verification result and assessment, comments or RFC columns).
- Go to Columns and deselect the columns that you do not want to see.
Once the selections are made, click on Show to see the set of requirements for which the verification plan details are to be defined.
Step 3: Add data in verification table
In the table, you can now start adding the contents of your verification plan:
Go to the column Responsible, and select Architect
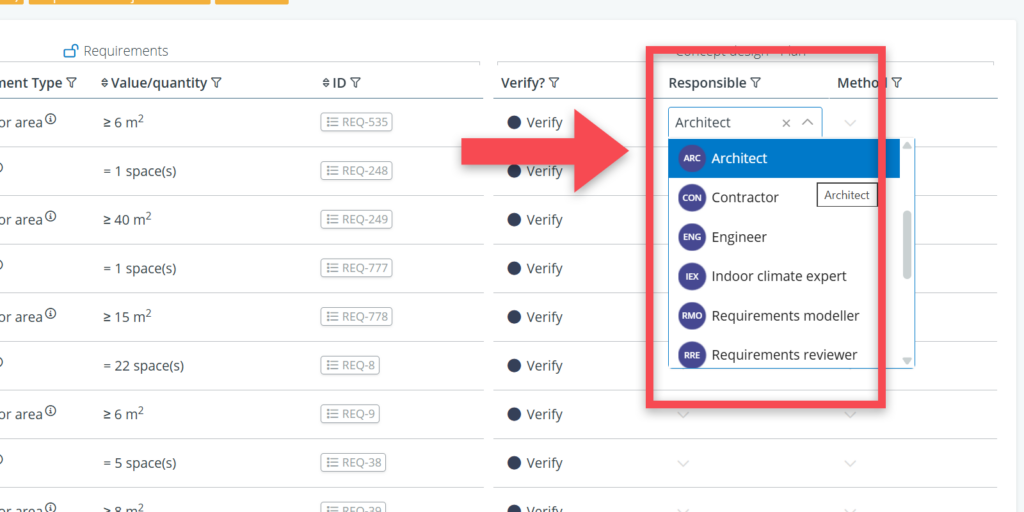
Go to the column Method and select Design document.
And that is basically it. To create the full plan, you will go through these steps for all the types of requirements in the model.
Tips and tricks
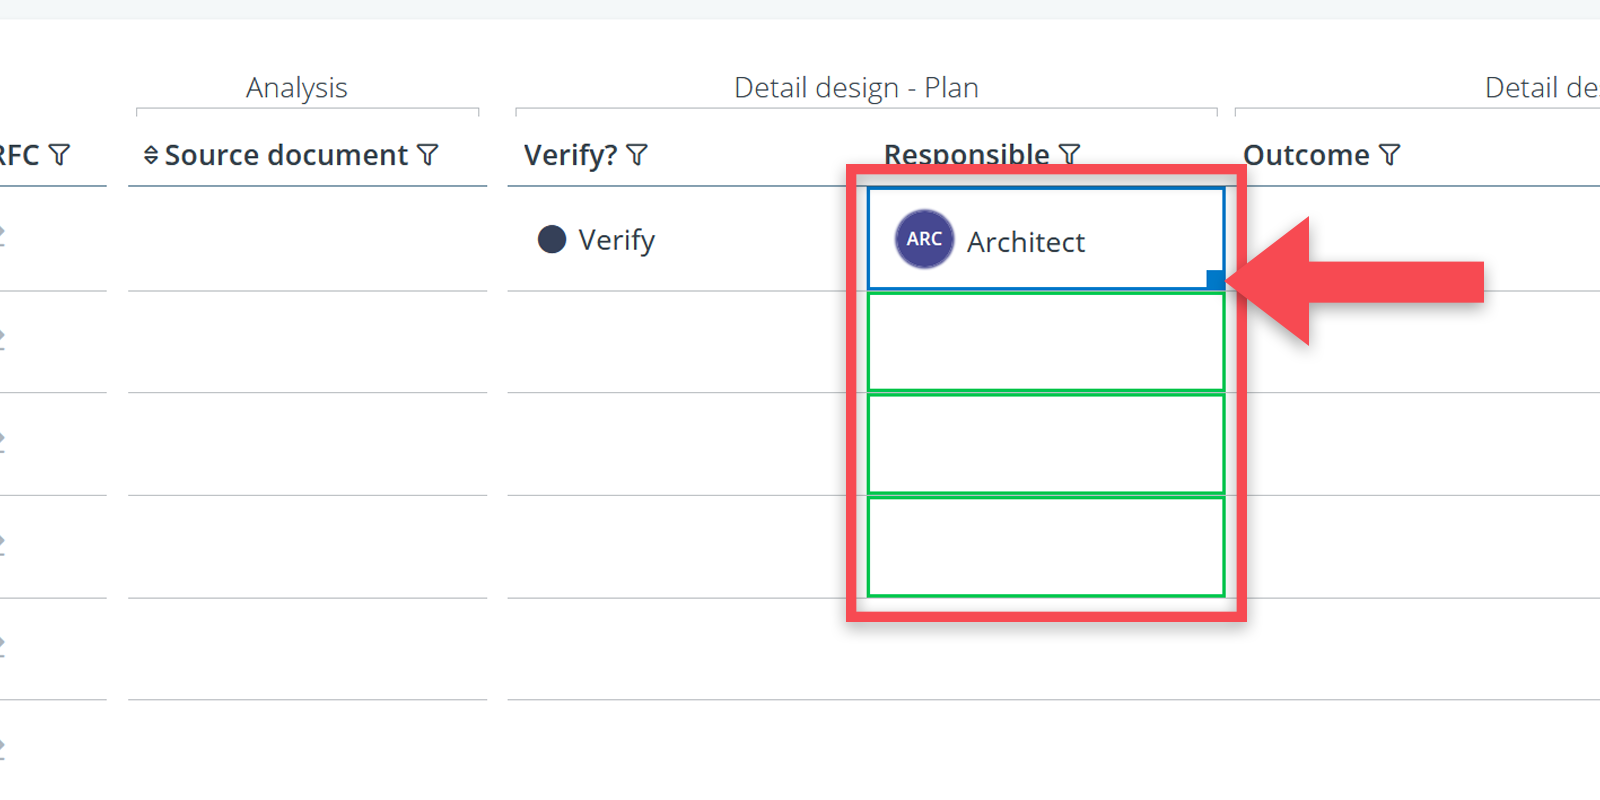
Dragging values
When having lots of rows, you can use cell dragging to speed up the process of adding data. For this, click and hold on the small blue corner of a cell and drag it down.
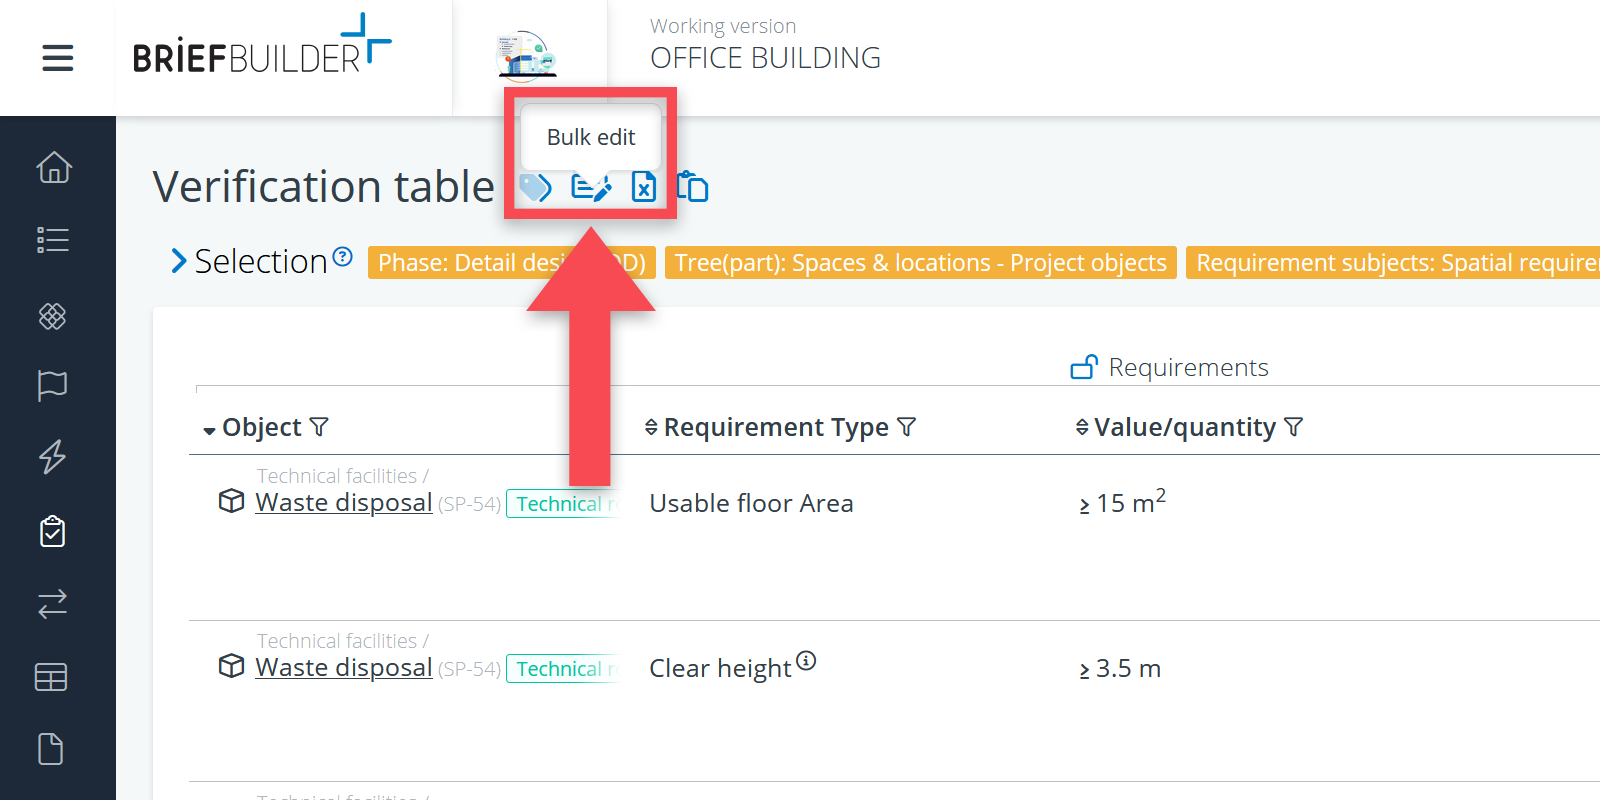
Bulk edit
When not using the aggregate option in the requirement selection menu, you also edit large amounts of verification data by means of the the bulk edit button at the very top of the verification table. This article explains how the bulk edit works.
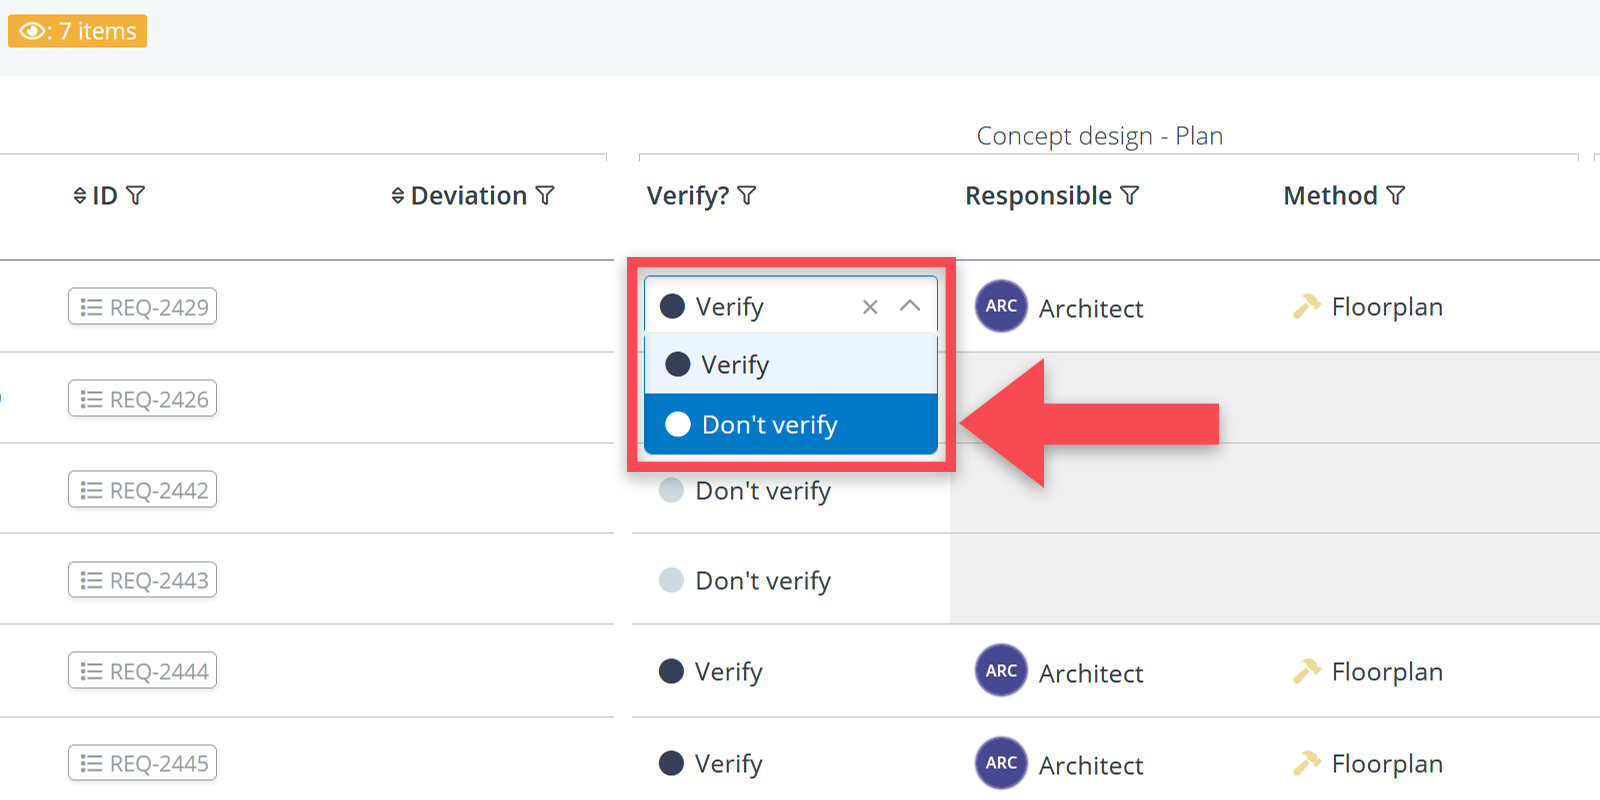
The ‘Don’t verify’ option
When making your verification plan, you may also want to indicate that particular requirements should not be verified in a particular phase. This can be done in the following way:
(1) On the selections page, select the relevant phase.
(2) On the same page, select the requirements that you do not want to verify in that phase.
(3) Click on show and in the table itself select Don’t verify in the Verify column.
Finding omissions
To check whether you have missed or overlooked any of the requirements in your plan, you can again use the table selections. For example: by filtering on Yes in the column Verify? and then on Empty in the column Responsible, you will see all the verifications that haven’t been assigned yet.
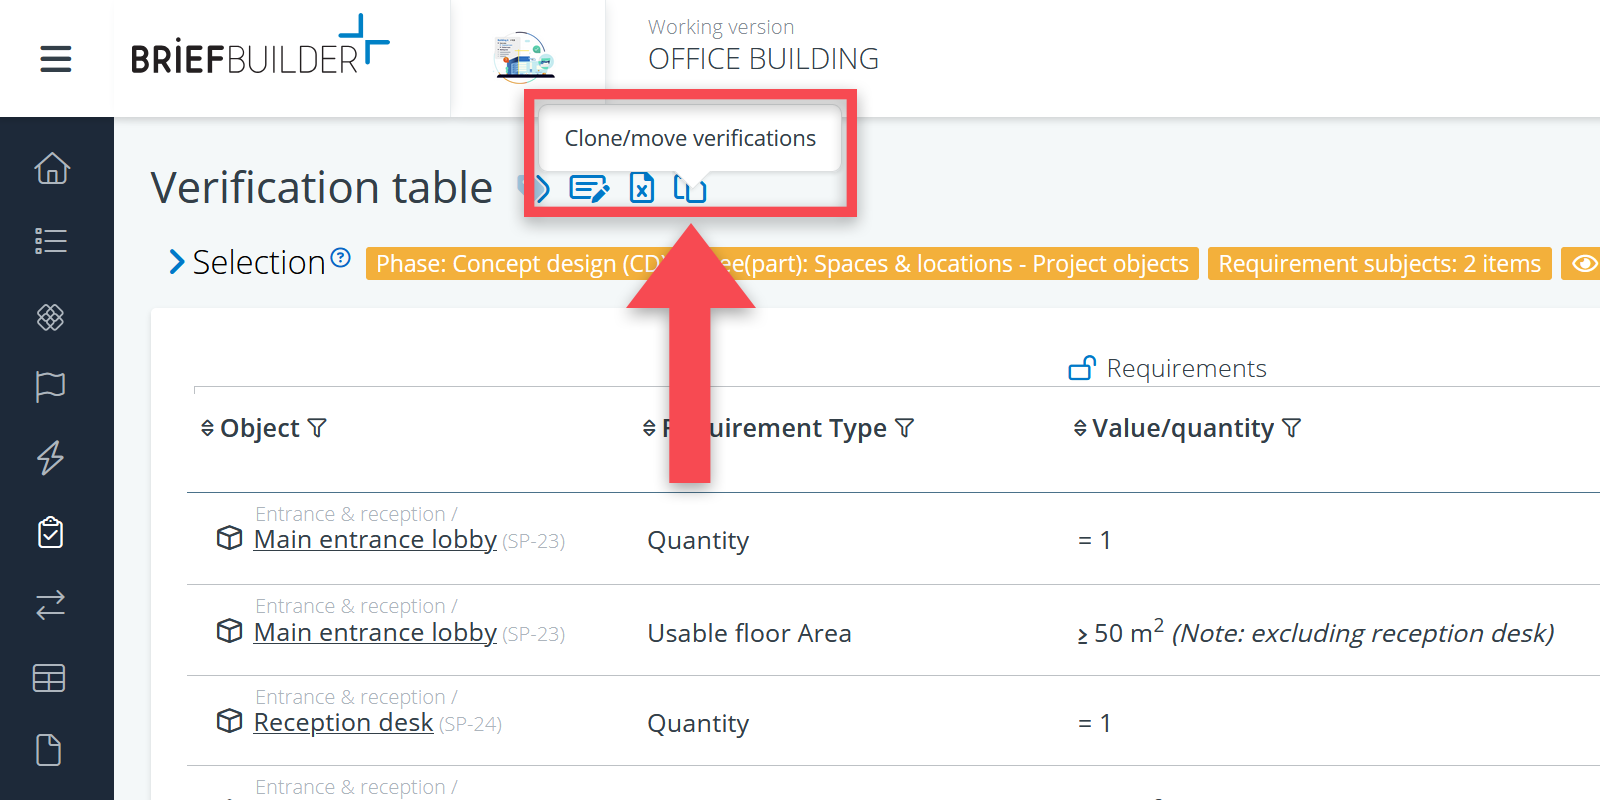
Cloning/moving verifications to another phase
When working on your verification plan, it might occur that you suddenly realize that it would be better to verify a particular set of requirements in another phase than where they currently are.
Or, when already doing verifications, you might realize that you want to re-verify a particular set of requirements (e.g., those that had ‘non-compliant’ as a result) in the next phase.
In both cases, you want to transfer verification data from one phase to another. In BriefBuilder, this can be done with the clone/move verifications button () in the verification table.

To move or clone verification data to another phase, you have to do the following:
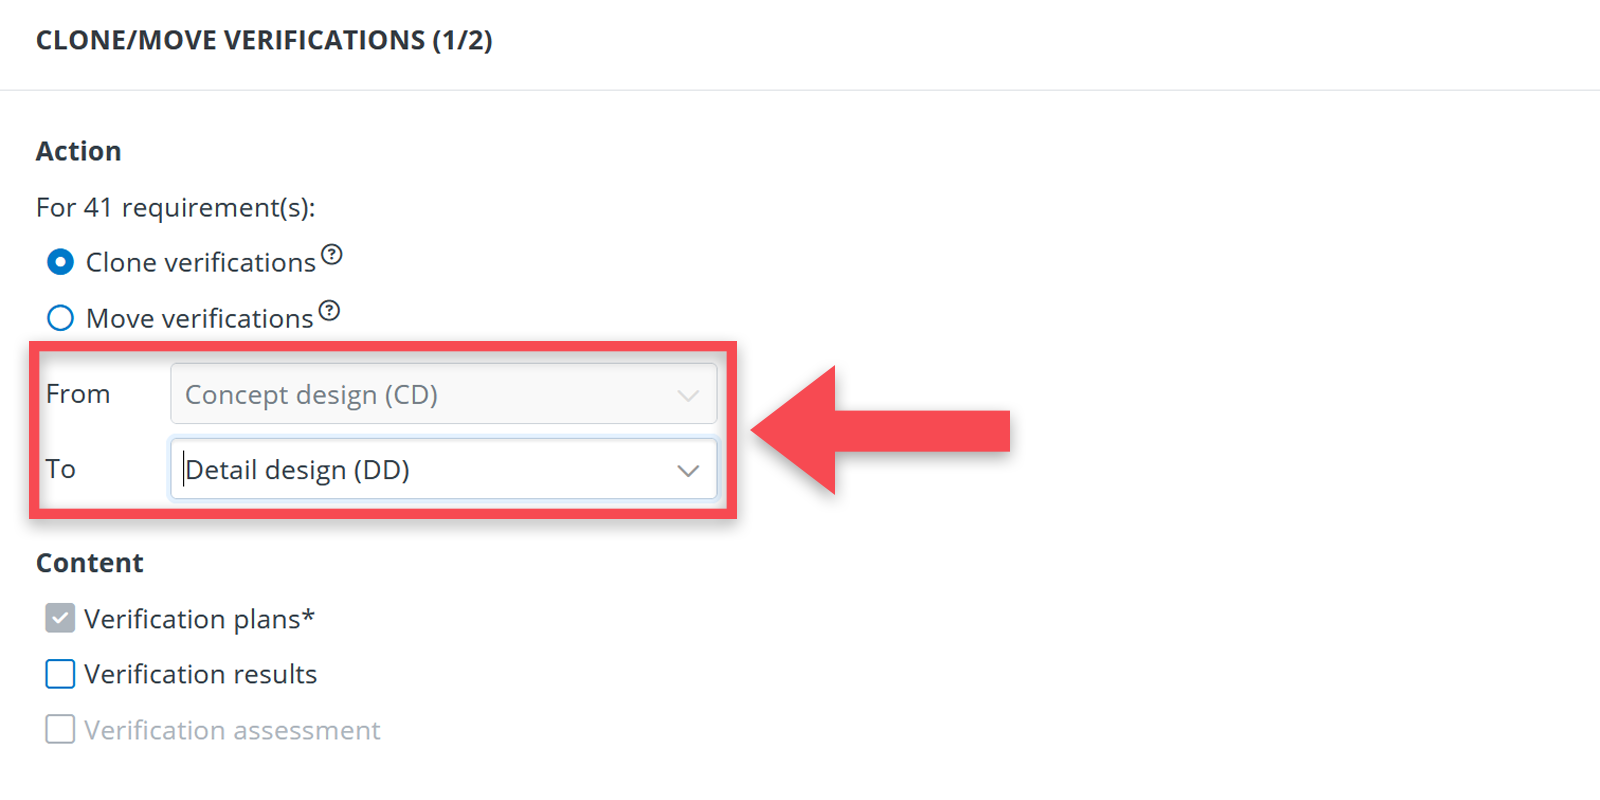
1. In the selection window, select the phase for which you want to clone/move verification data.
2. In the same window, use the other selections to get the set of requirements for which you want to move/clone verification data. When done, click on Show.
3. In the table itself, you may want to use the filter options to further narrow your selection.
4. When you have the right set of data on your screen, click on the clone/move verifications button ().
5. In the pop-up, choose whether you want to clone (= duplicate) the verification data in another phase, or really want to move the data to another phase. Please note: moving is literally moving in the sense that this action will empty the verification fields in the original phase.
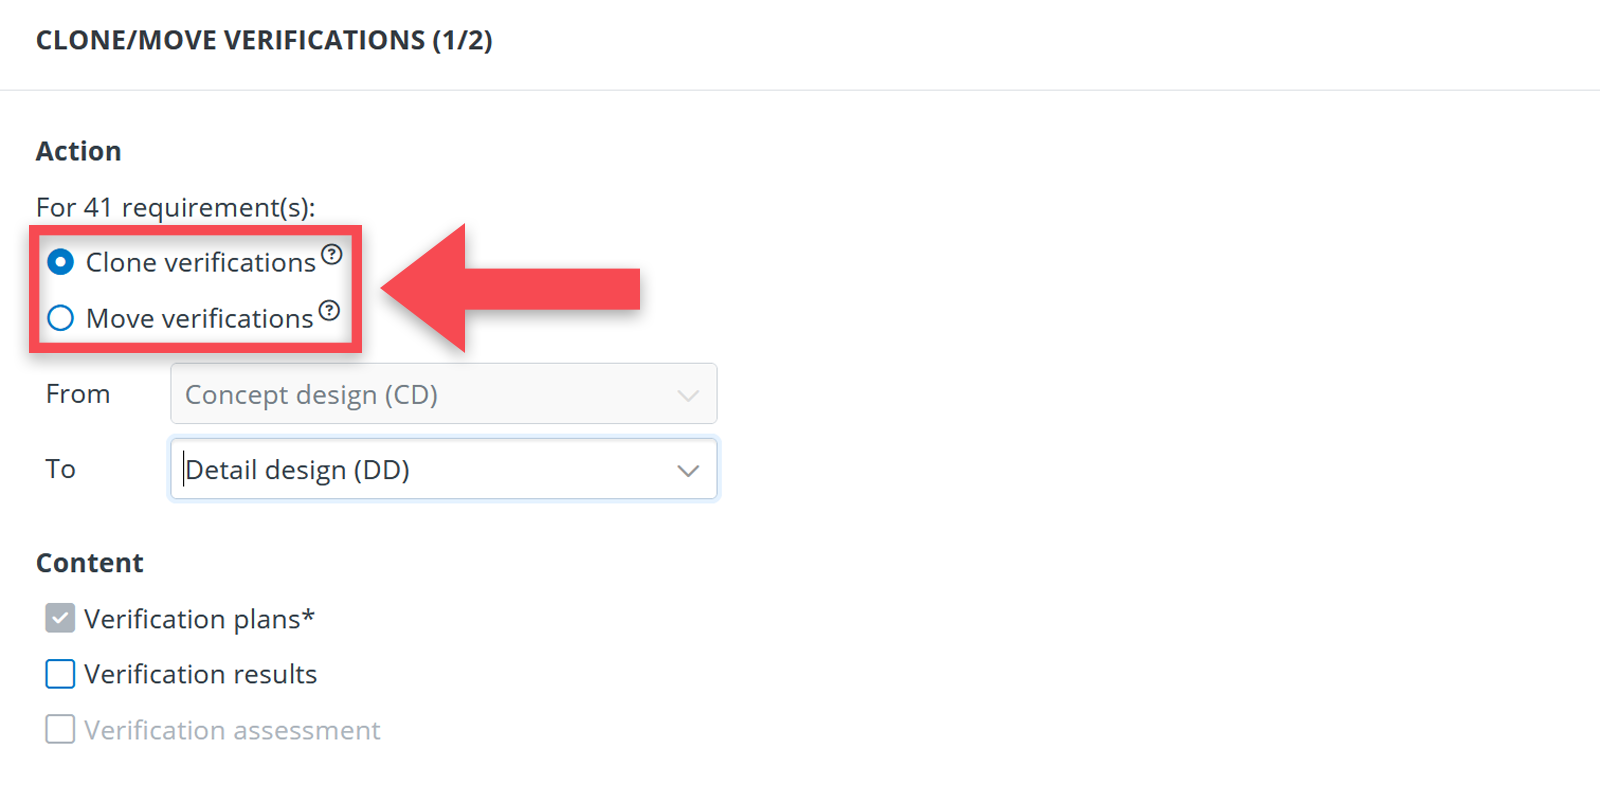
6. Select the target phase to which the data should be moved/cloned to. (Note: the source phase is a given as you have selected that in step 1).
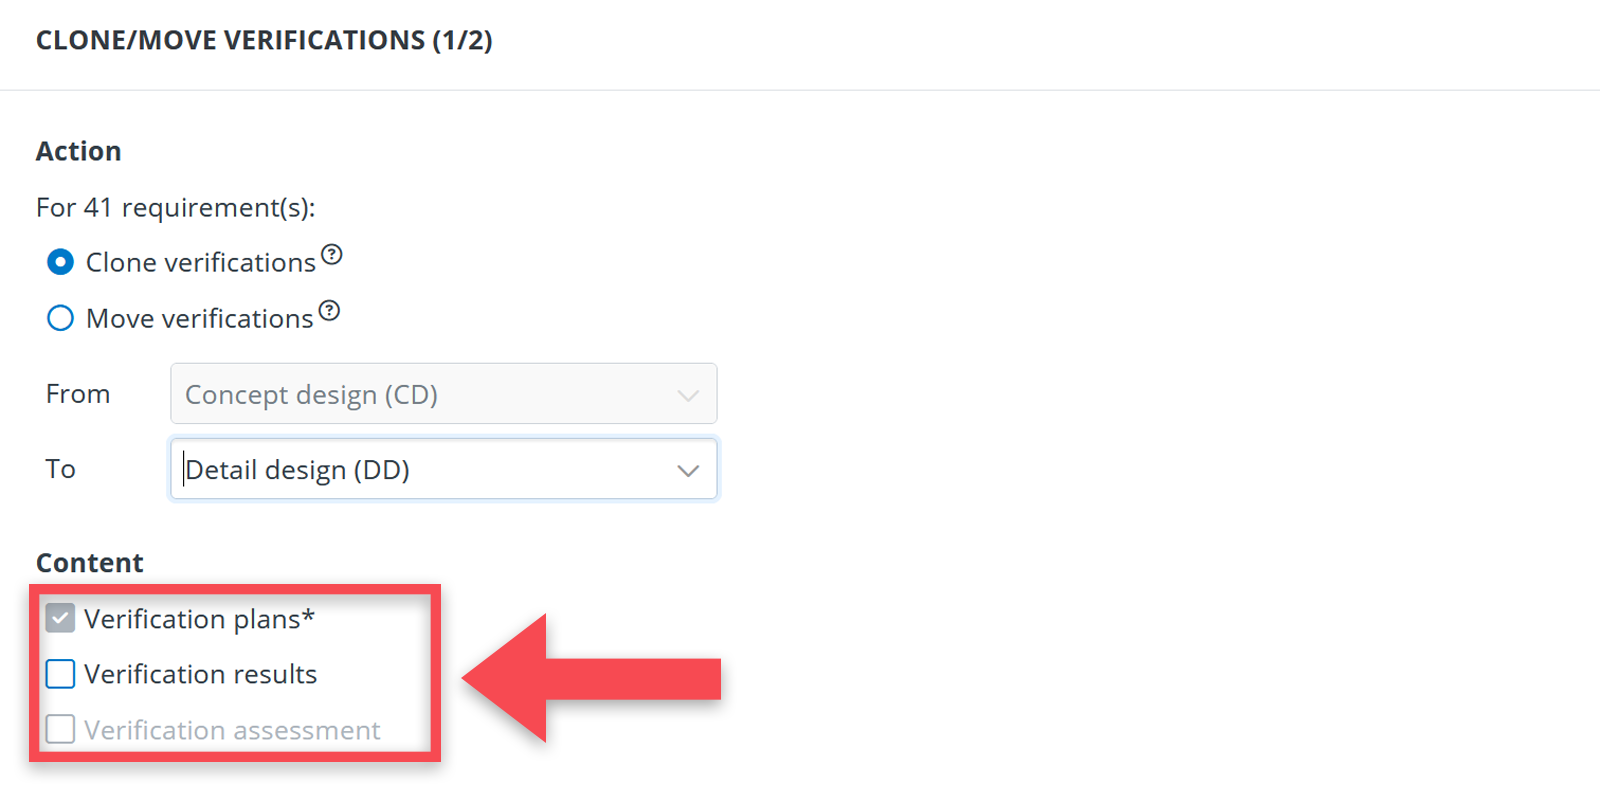
7. Choose whether you want to include the verification results or whether you only want to move/clone the verification plans.
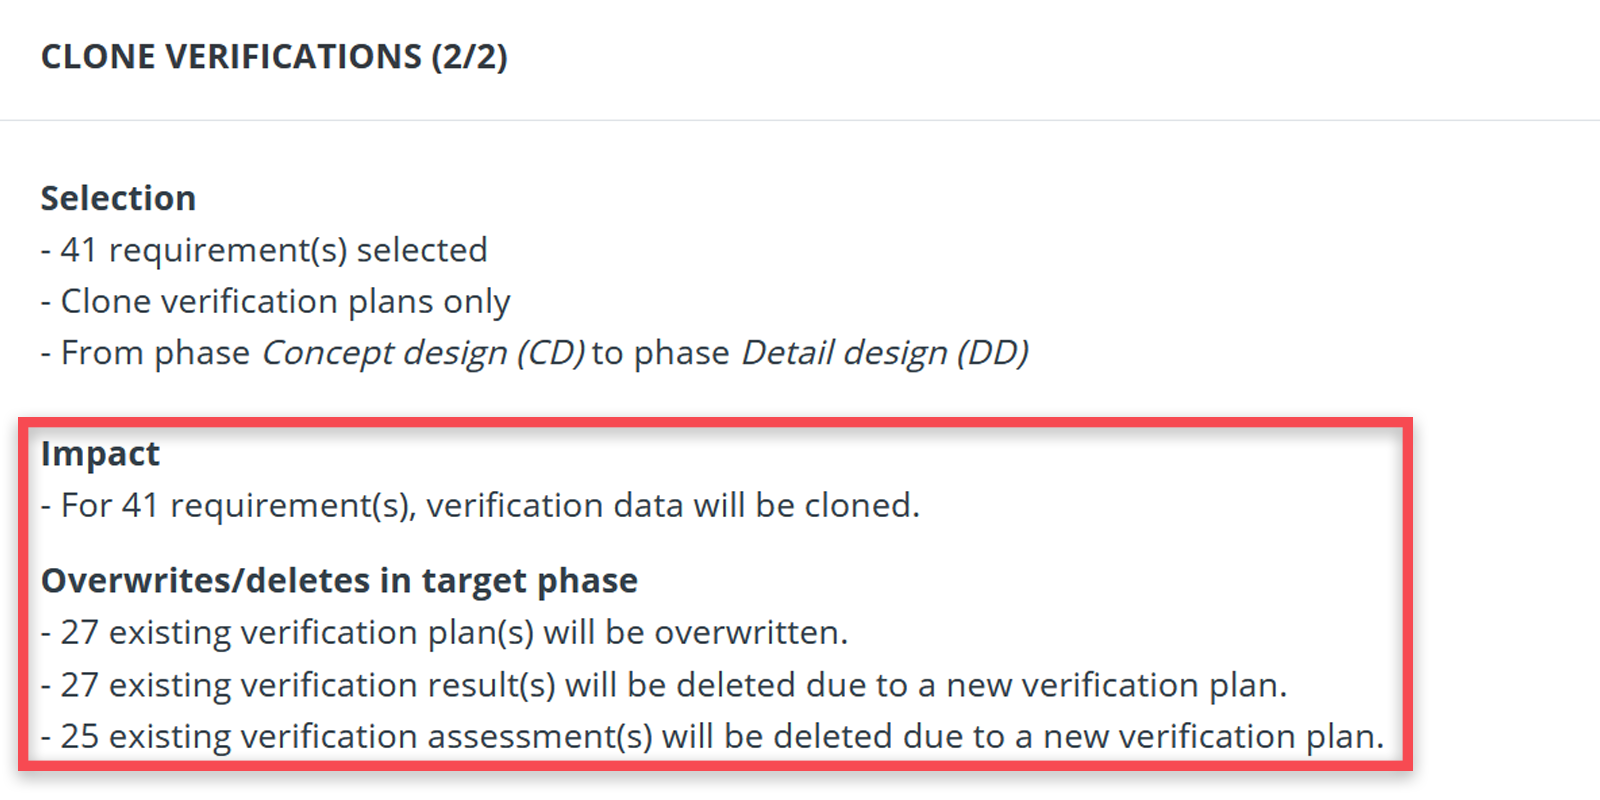
8. Click on Next and check the impact summary to ascertain yourself that you are doing what you intend to do.
9. Last: click on the clone/move button in the lower right corner of the pop-up.
Please note: once you have completed the operation, you are still in the table selection that you started with. To see the moved/cloned verifications, you have to go back to the selection screen and select the appropriate phase.
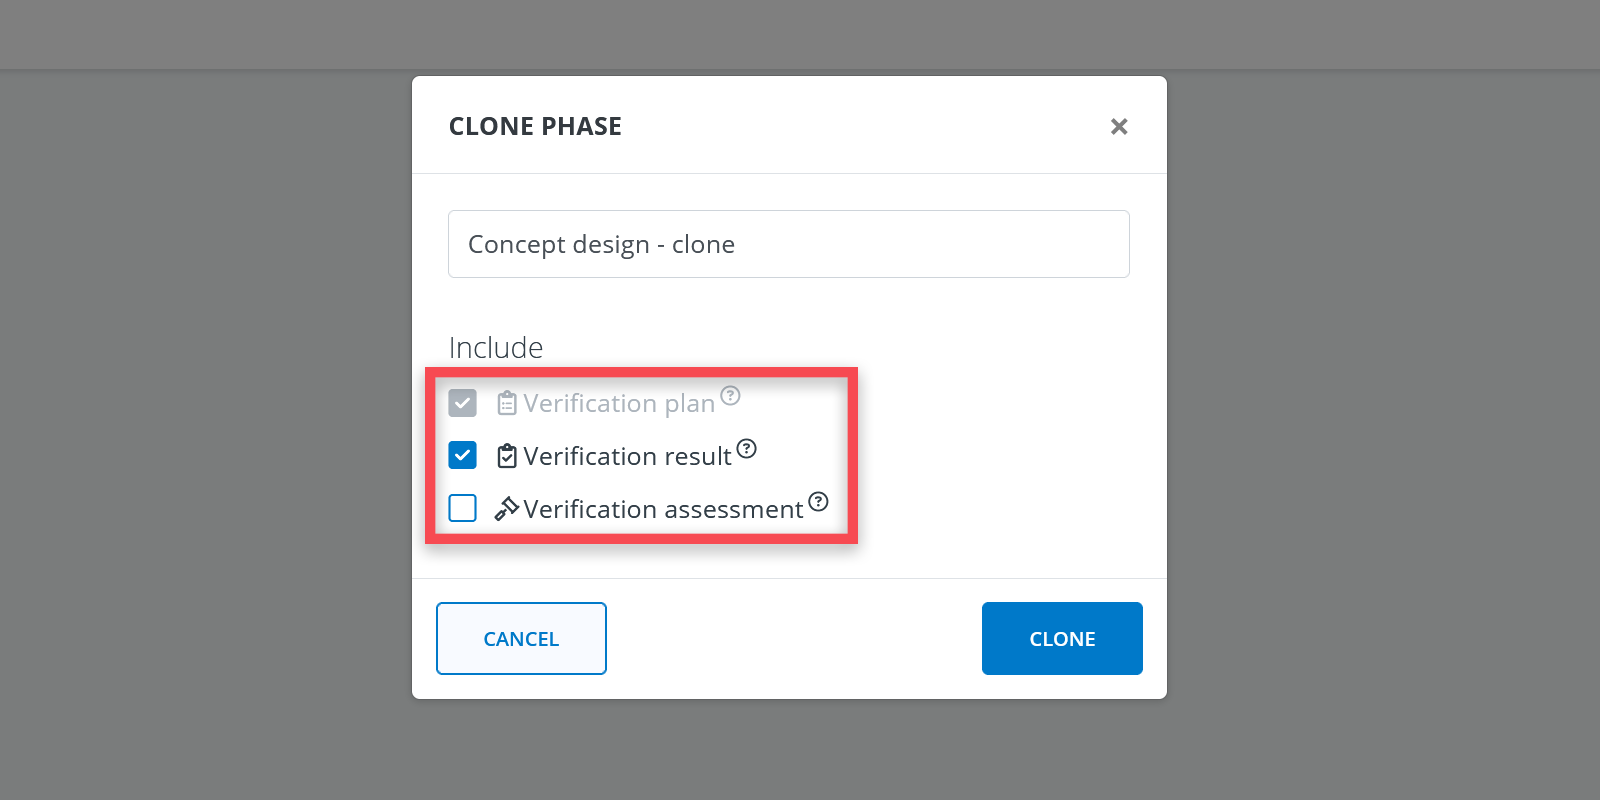
Cloning verification phases
As an alternative to the above, it can also be that you would like to clone an entire verification phase as a new phase. To do so, you have to navigate to the verification phases in the settings menu (Menu > Settings > Attributes > Verification > Verification phases).
There, you will see the verification phases that you have defined.
By clicking on the clone button (), you will get a copy of that phase plus the related verification data.
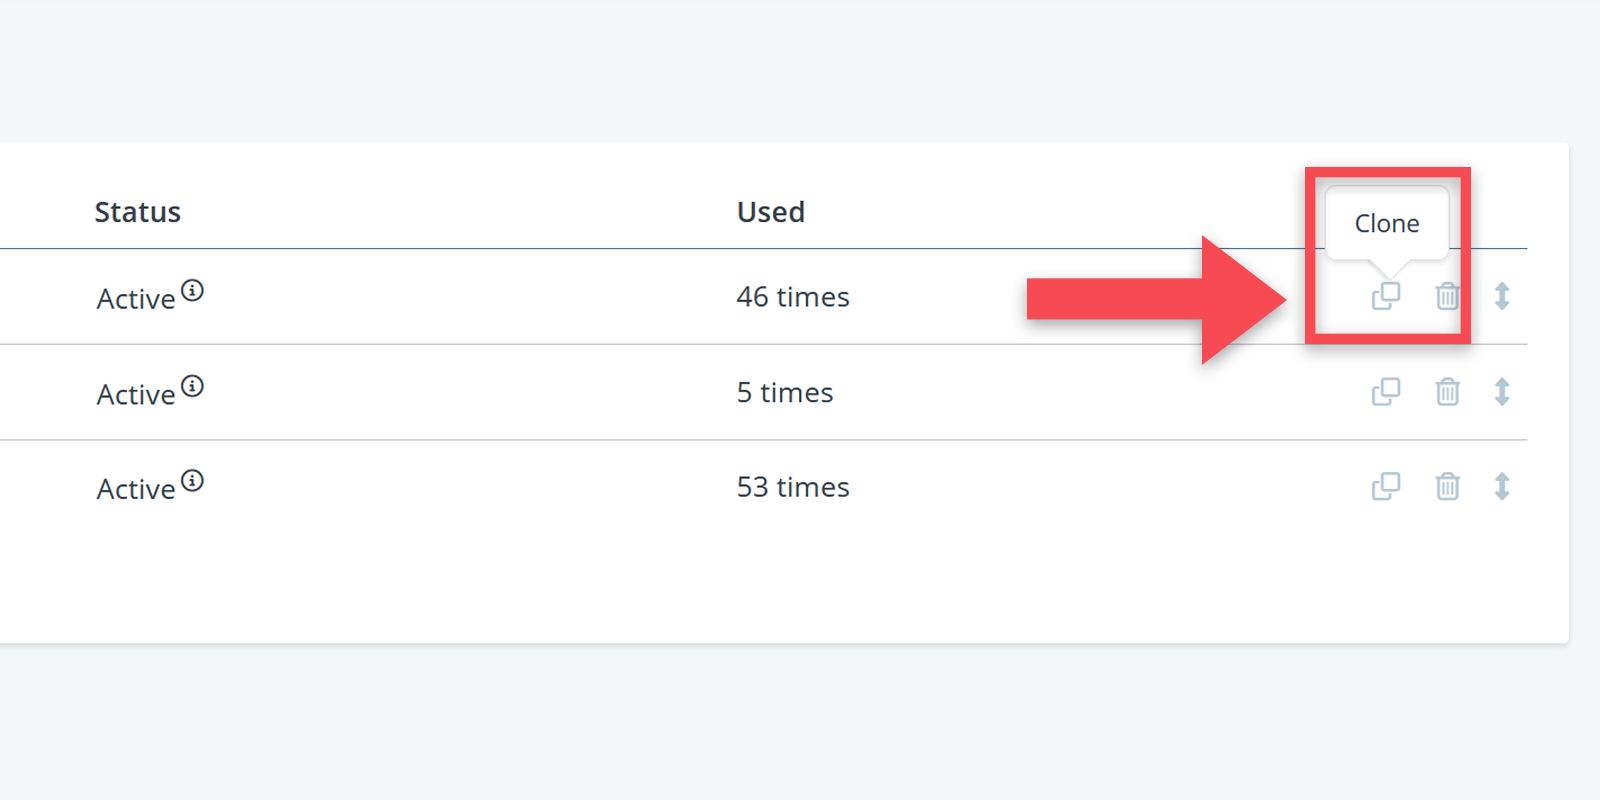
When making the clone, you get the option to include or exclude the verification results. The default settings is that verification results are not included.