
You might wish to use documents from a document management system (DMS) in BriefBuilder.
The most common reason for this is usually verification. You can support your verification result by connecting your verification to certain demonstration documents (e.g. test reports). These documents are often stored and managed in a DMS.
With BriefBuilder, you can set up a connection between your DMS and your project model.
This article explains how you can do this.
Please note: at the moment, BriefBuilder can be connected to the following document management systems:
- Microsoft Sharepoint
- Autodesk Construction Cloud
- Autodesk BIM 360
- Bricsys 24/7
Don’t hesitate to contact us concerning connections to other systems.
Configuring the DMS connection
To set-up the DMS connection, do the following:
1. Before getting started in BriefBuilder some steps might first be required in the DMS system.
- Microsoft Sharepoint: no steps required
- Autodesk Construction Cloud: Add the BriefBuilder app to your environment
- Autodesk BIM 360: Add the BriefBuilder app to your environment
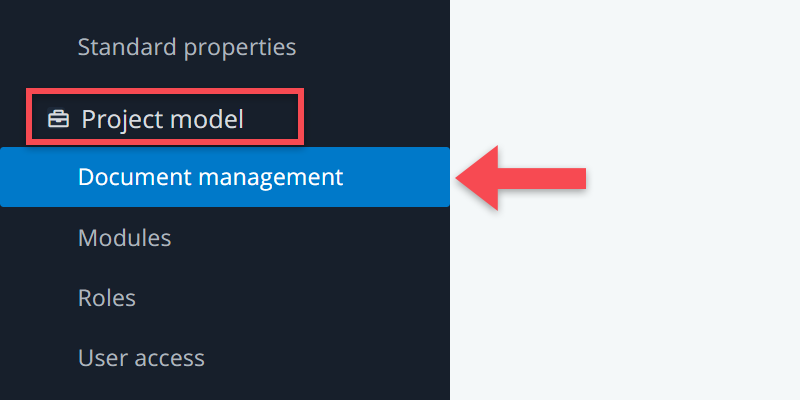
2. Go to Document Management in the settings menu (Note: you need the role requirements manager to see these settings)
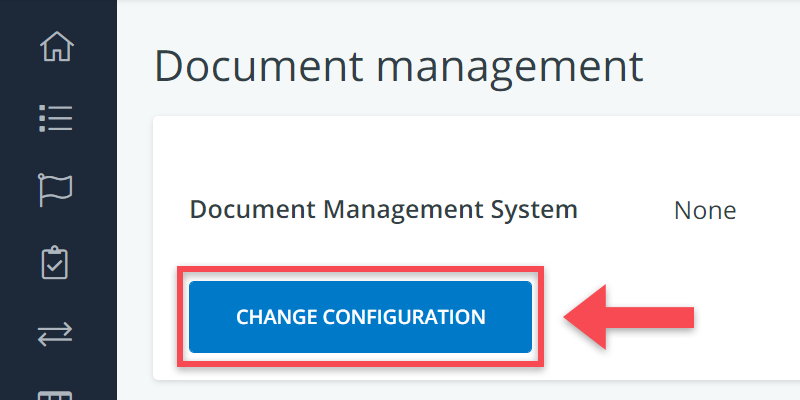
3. Click on Change Configuration (default setting is ‘none’)
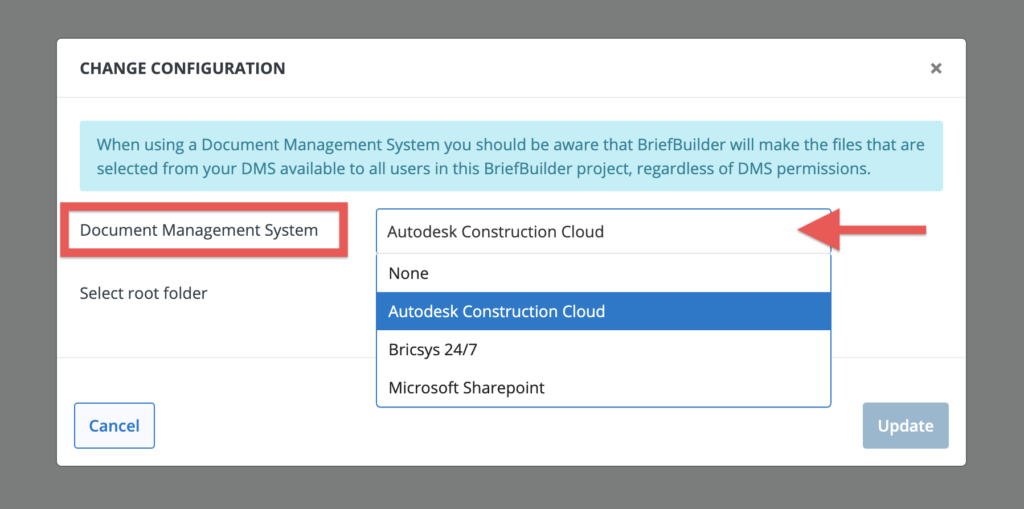
4. Select the DMS that you are using for this project (for BIM 360, select Autodesk Construction Cloud)
5. Click on the Authenticate button, which will prompt you to log onto your DMS and allow BriefBuilder to access the DMS’ files
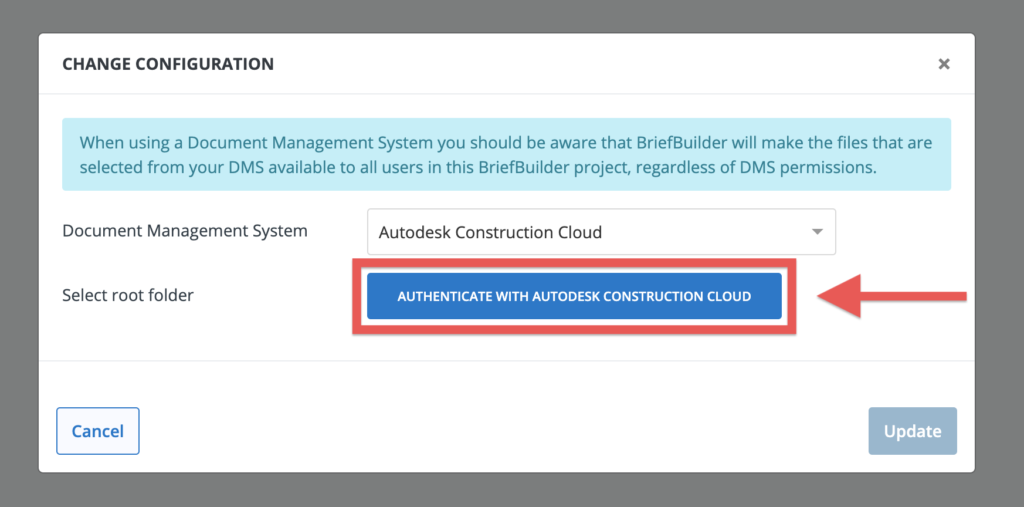
6. After the authentication, you will—automatically—return to BriefBuilder
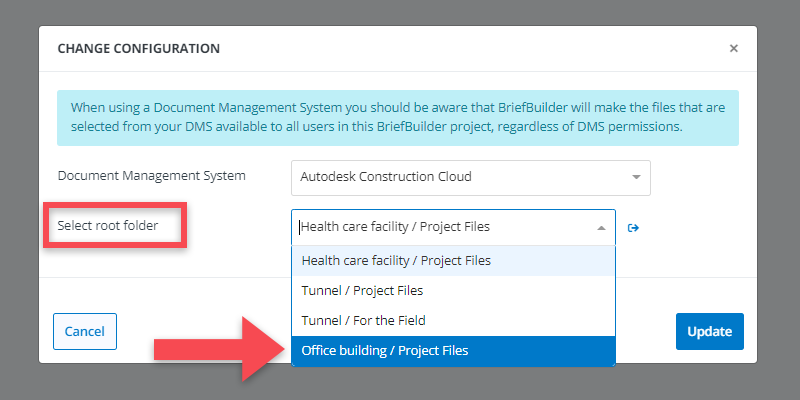
7. In case you have access to multiple projects and/or document folders via your DMS, select the right root folder for this particular project
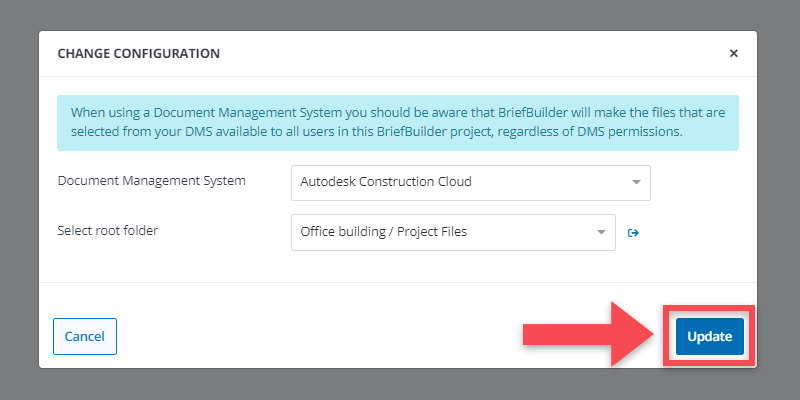
8. Click on Update, and you are done!
You can now add documents from the DMS to BriefBuilder—assuming you have the right permissions for both BriefBuilder and the DMS.
Removing the DMS configuration
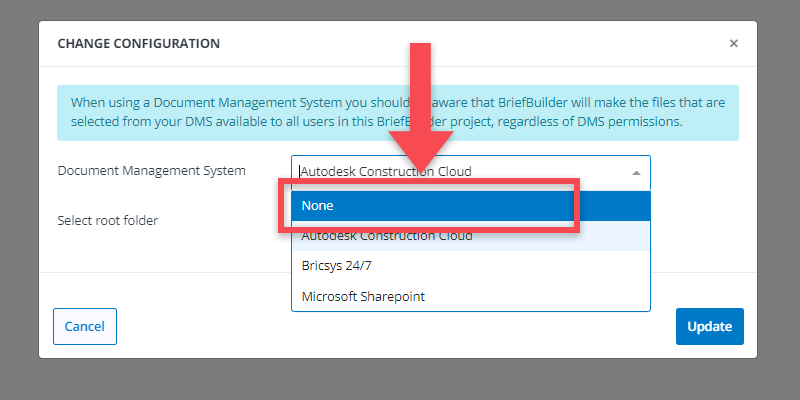
To remove the configured DMS connection, you simply have to select none as document management system in the settings menu.
Removing your authentication
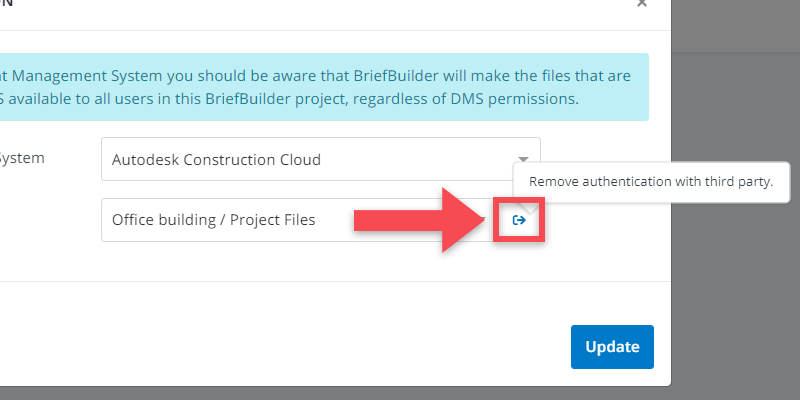
To remove your authentication for the chosen DMS, you have to click on the icon behind the chosen root folder.
Linking DMS documents to verifications
As a BriefBuilder user, you can work in usual way to connect demonstration documents to verification results—but to have access to the DMS you must authenticate your credentials for the DMS when you are trying to log in for the first time.
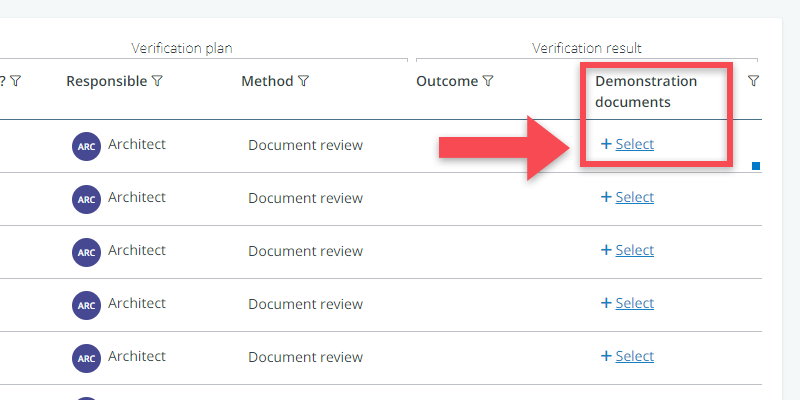
Below, we will explain how this works, using the verification table as an example.
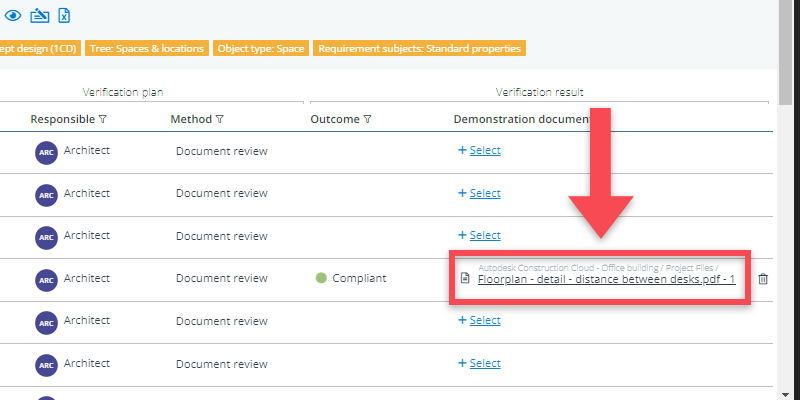
1. Go to the verification table’s last column (Demonstration documents), and click on Select
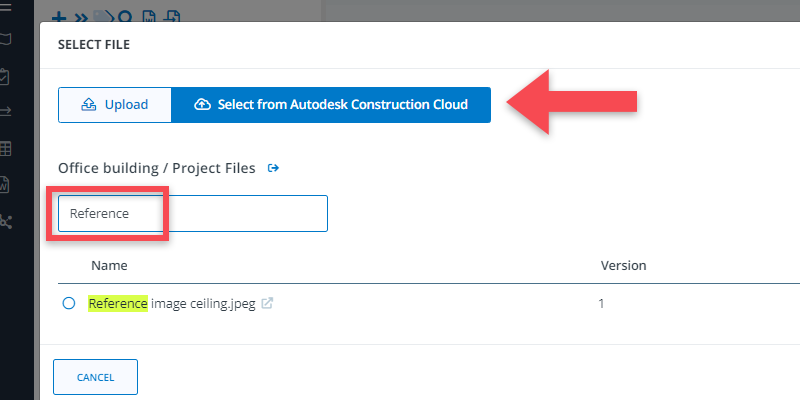
2. You will then get a pop-up in which you can choose to select a document from the DMS or from the demonstration documents tree; select the first, if not already selected.
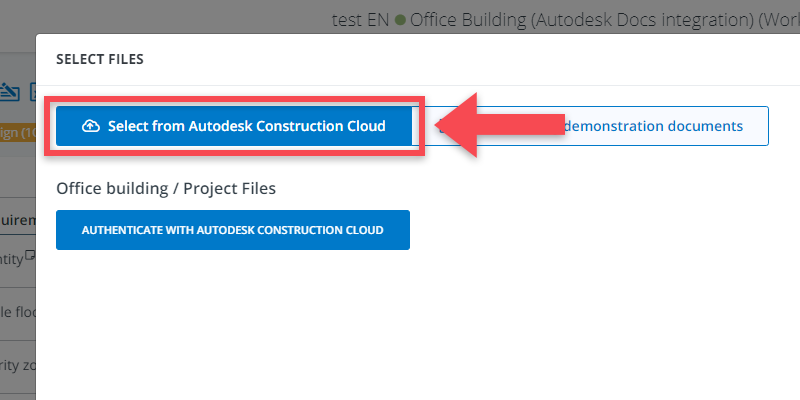
3. When using this feature for the first time, you will also see a button Authenticate in this pop-up, which will bring you to an authentication screen in the configured DMS.
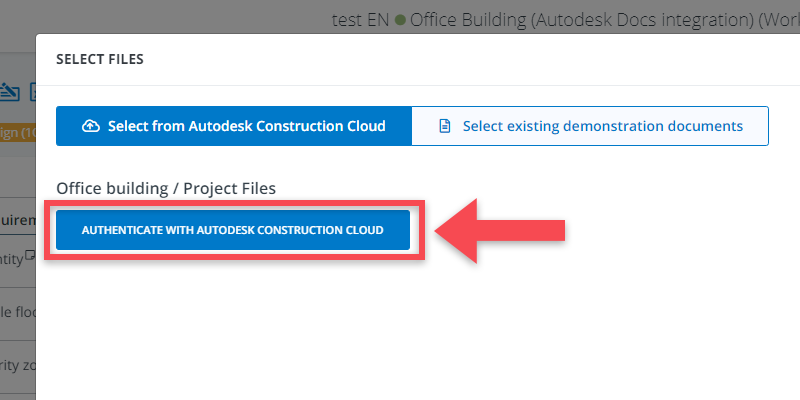
4. Make sure you are authenticated, after which you will automatically return to BriefBuilder.
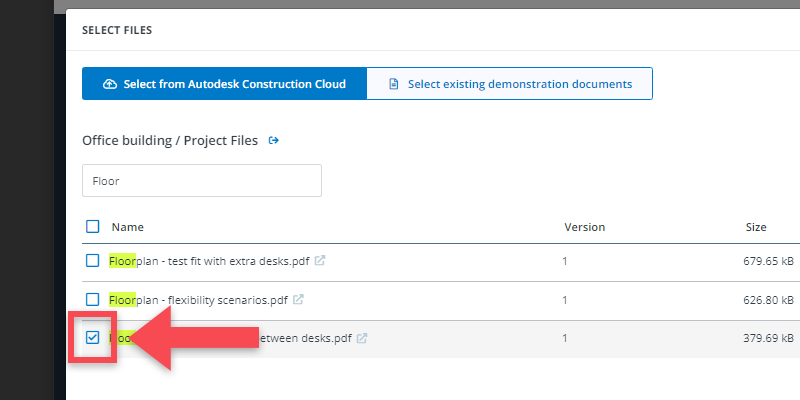
5. Once authenticated, you can get to work and search for the document that you are looking for by simply entering its name in the search window.
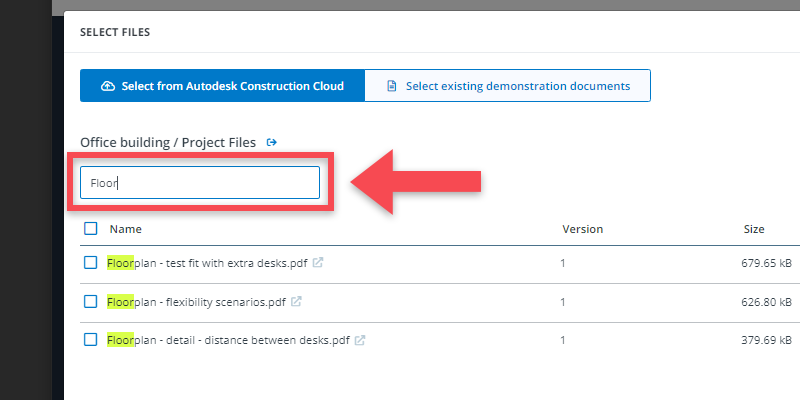
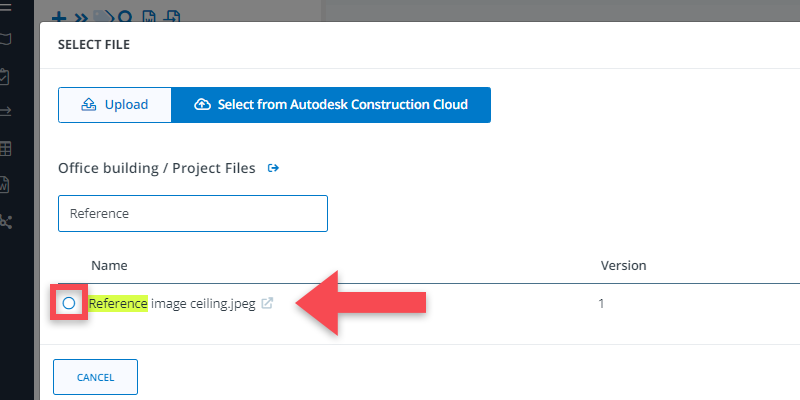
6. Select the right document(s) for this verification by ticking the check box in front of it
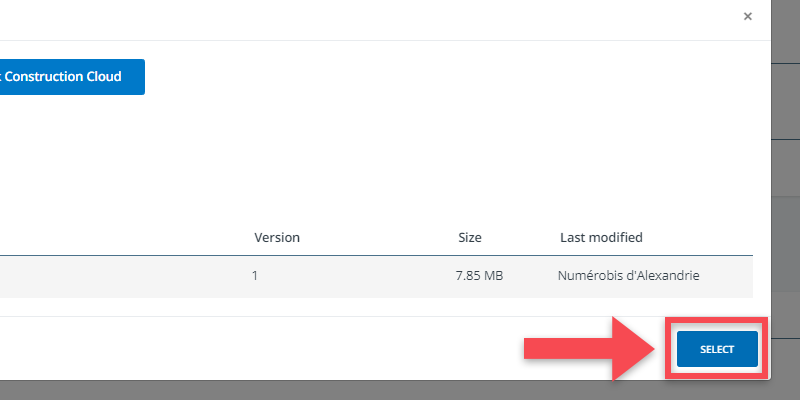
7. Click on Select
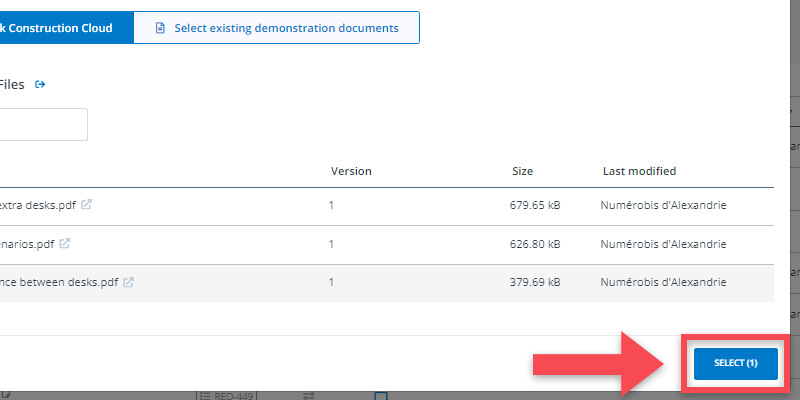
8. And then you have successfully linked your document(s) to your verification result!
Demonstration documents tree
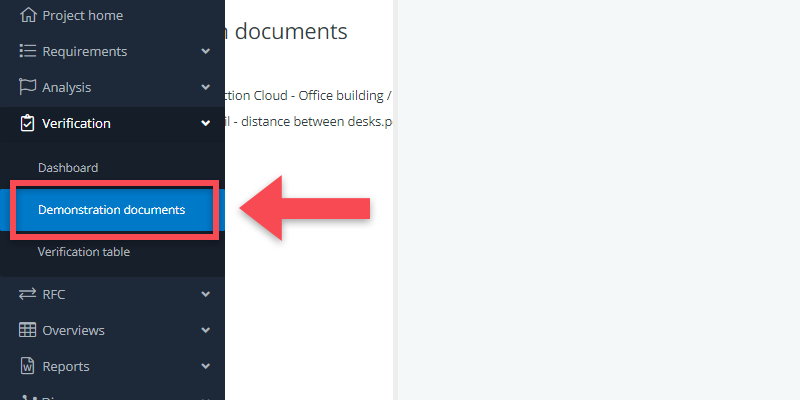
It is important to know that all the documents that are selected from the DMS via verifications are captured in the demonstration documents tree in BriefBuilder.
You can find that the overview of demonstration documents via the main menu (Navigation menu > Verification > Demonstration documents).
When using a DMS, you wil notice a dedicated folder in that tree where all the DMS documents that you have selected have been placed.
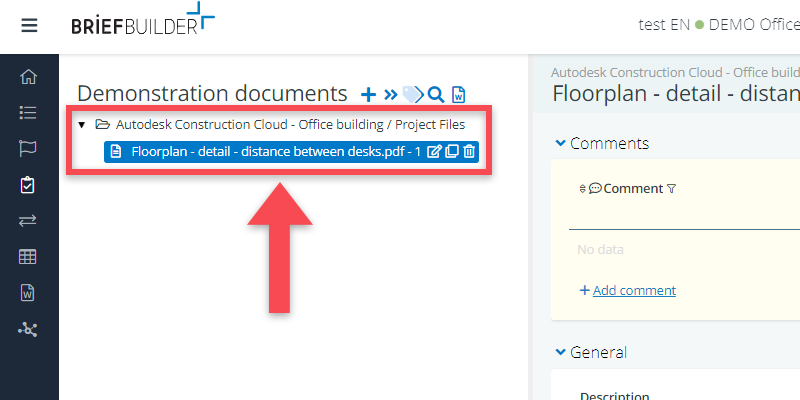
This is also the place where you can remove demonstration documents if you wish to.
Linking DMS documents to requirements
It is also possible to link documents from the DMS directly to requirements. This can be done for both supporting files (for properties) and for the uploads (for objects).
Below we explain how this works, using a supporting file as an example.
1. Go to the supporting file field.
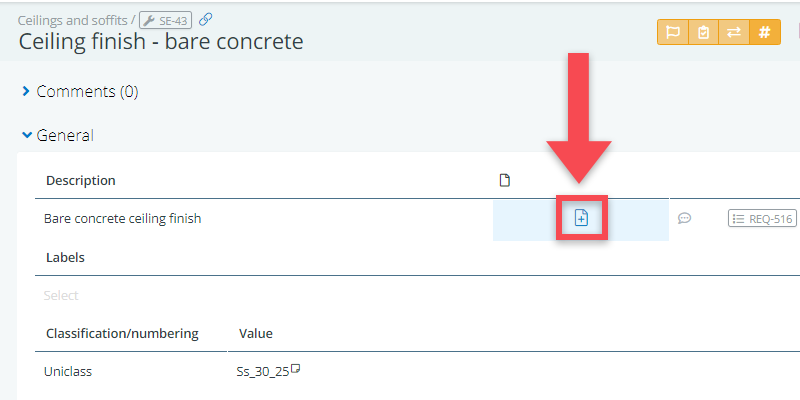
2. Click within the field, after which get a pop-up in which you can choose to select a document from the DMS or upload one from you own device; select the DMS option, if not already selected
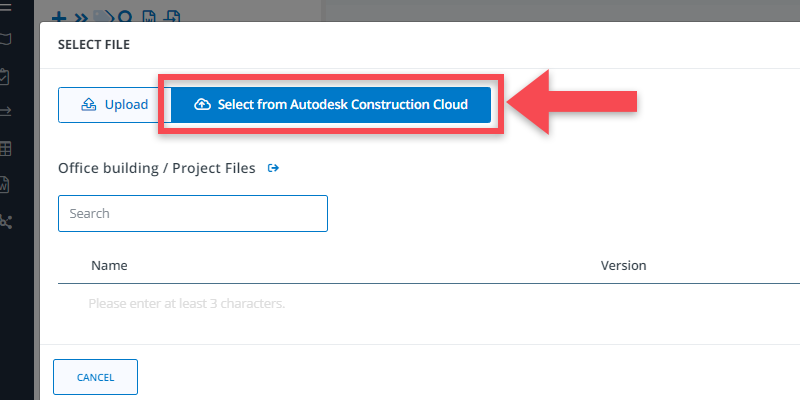
3. When using this feature for the first time, you will also see a button Authenticate in this pop-up, which will bring you to an authentication screen in the configured DMS.
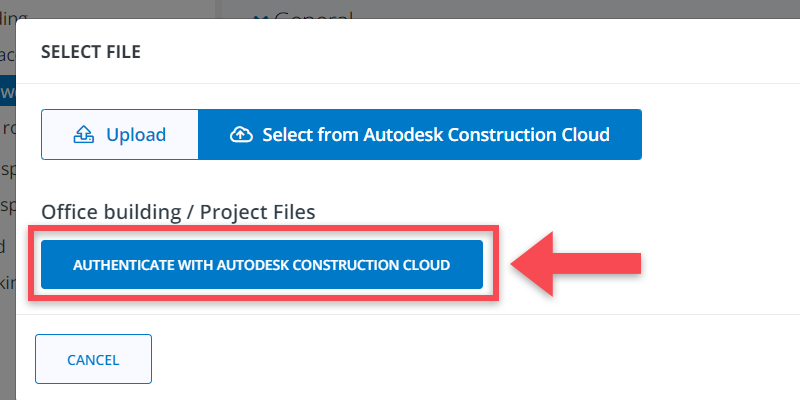
4. Make sure you are authenticated, after which you will automatically return to BriefBuilder.
5. Once authenticated, you can get to work and search for the document that you are looking for by simply entering its name in the search window.
6. Select the right document(s) by ticking the checkbox in front of it
6. Click on Select
7. And you are done!
Viewing DMS Documents
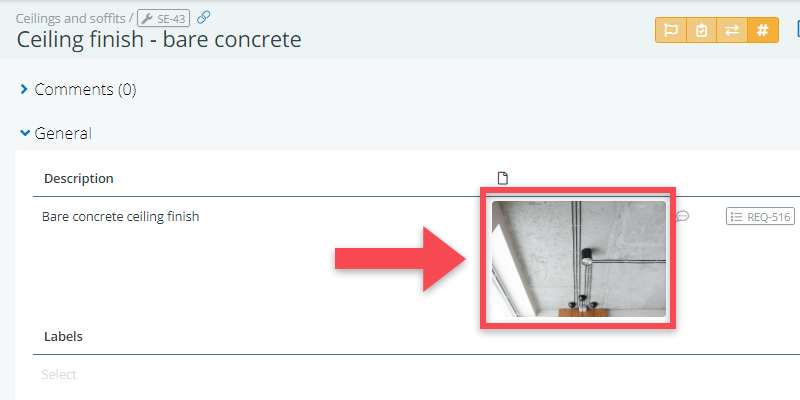
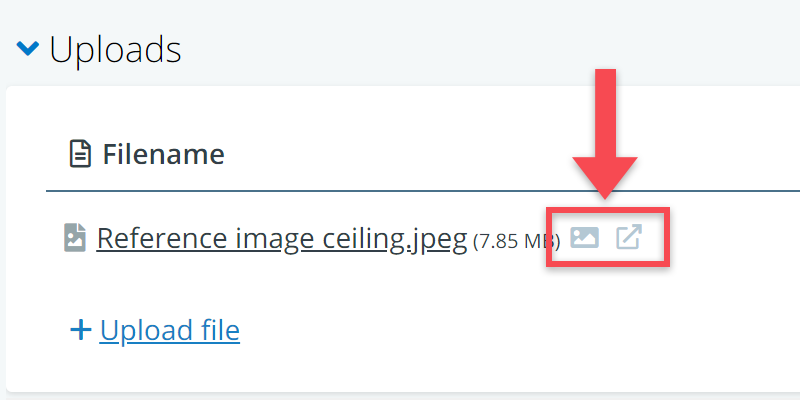
Once you have selected a document from a DMS, there are two ways of viewing the document: you can view it in BriefBuilder, or you can view it in the DMS. The advantage of the latter is that you can probably see more ‘metadata’ about the document in the DMS.
To see the document in BriefBuilder, click on the icon.
To see the document in the DMS, click on the icon.
Removing your authentication details
When you want to remove or renew your authentication, you have to click on the icon in the DMS window.
Prerequisites for Autodesk Construction Cloud
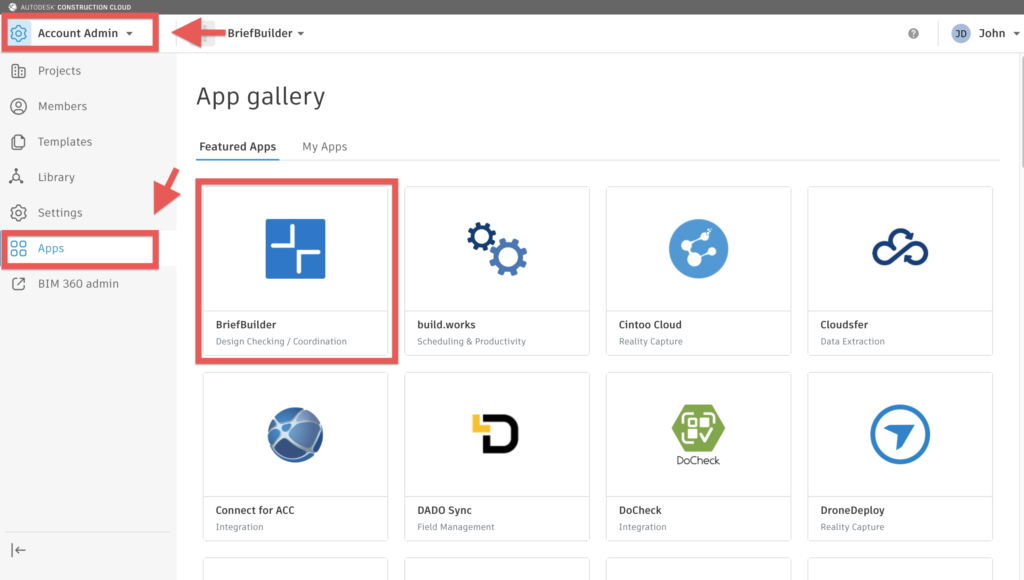
Before you can integrate with Autodesk Construction Cloud, it is required that you add the BriefBuilder app in the Autodesk Construction Cloud app store. Please do so with the following steps:
1. Go to the App store in the Autodesk Construction Cloud environment that you would like to use, click “Account Admin” and then “Apps”. Search for the BriefBuilder app. You may have to scroll a bit down. Then click on it
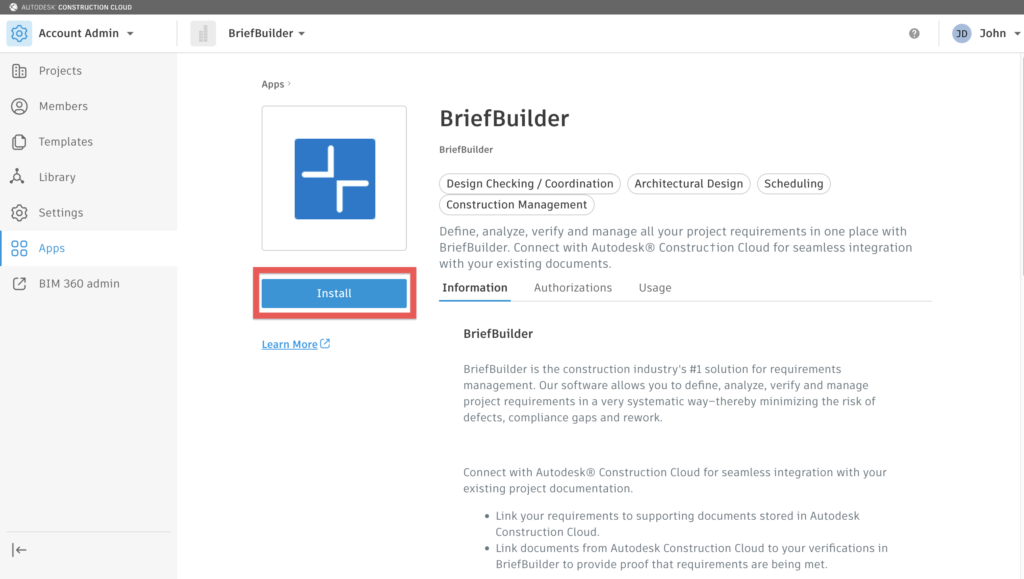
2. On the BriefBuilder app page, click the install button
3. Check the authorization requirements and when you are ready click “Authorize and Install”.
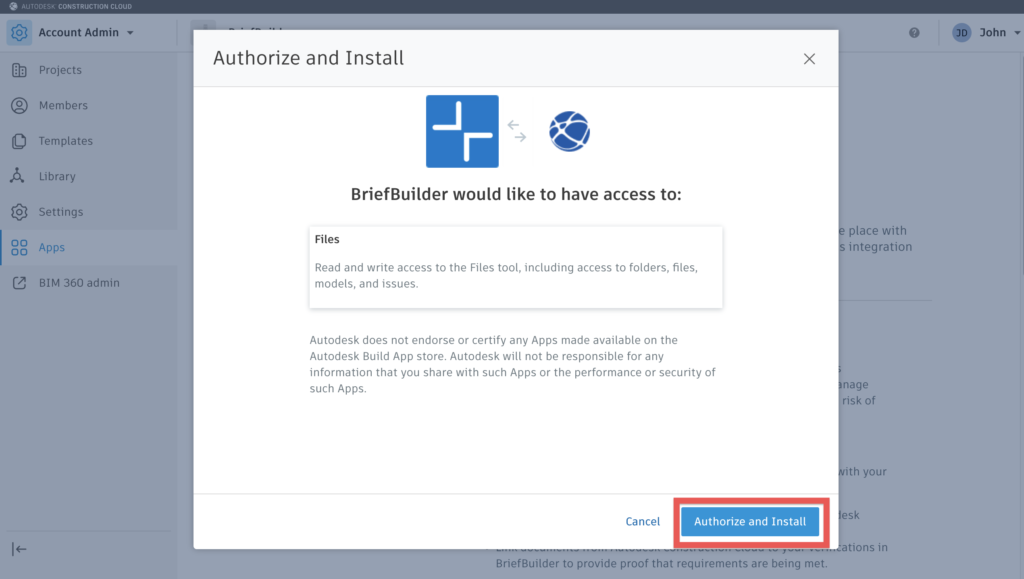
Please note that although the message notifies BriefBuilder might also get write access, this is in fact not the case. BriefBuilder will only read information. When individual users login to Autodesk to use the integration, this also becomes clear as we will request “Read access” as you can see here:
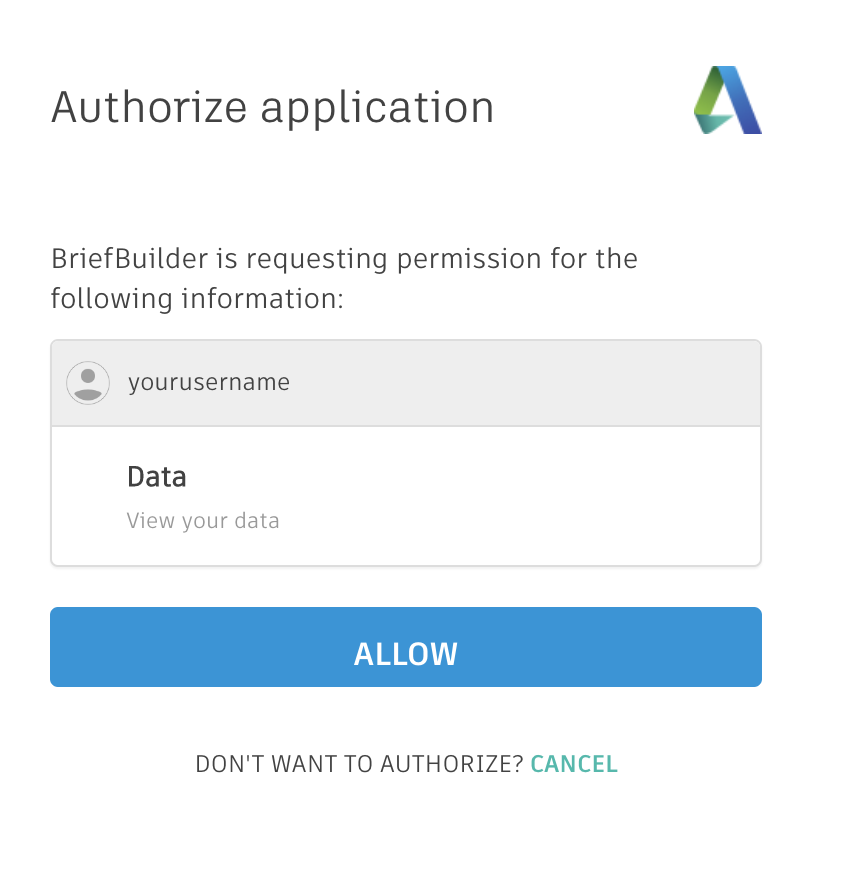
4. You are now done with the prerequisites and can continue in BriefBuilder with the next step.
Prerequisites for Autodesk BIM 360
Before you can integrate with Autodesk BIM 360, it is required that you add the BriefBuilder app in the Autodesk BIM360 app store. Please do so with the following steps:
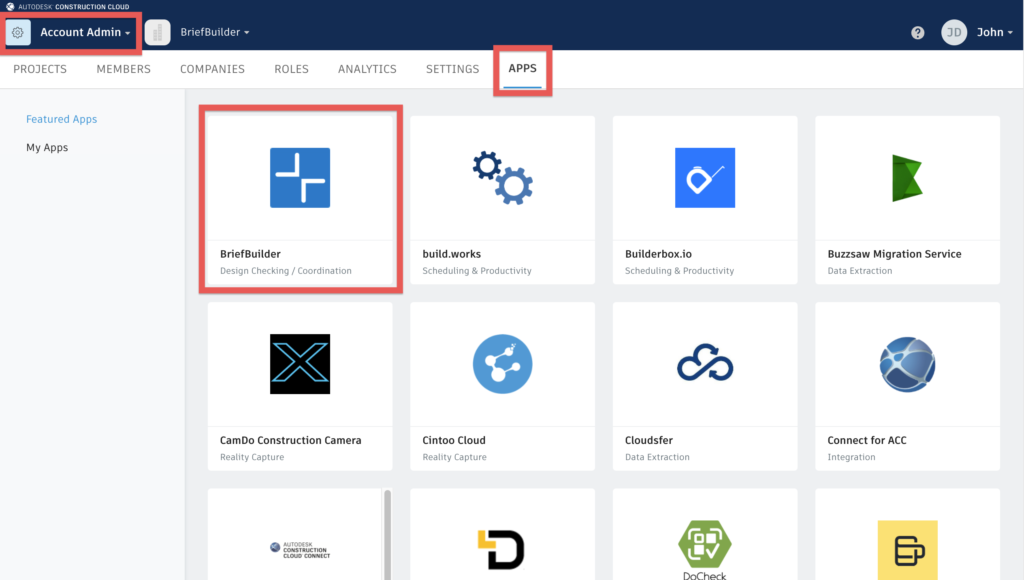
1. Go to the App store in the Autodesk BIM 360 environment that you would like to use, click “Account Admin” and then “Apps”. Search for the BriefBuilder app. You may have to scroll a bit down. Then click on it
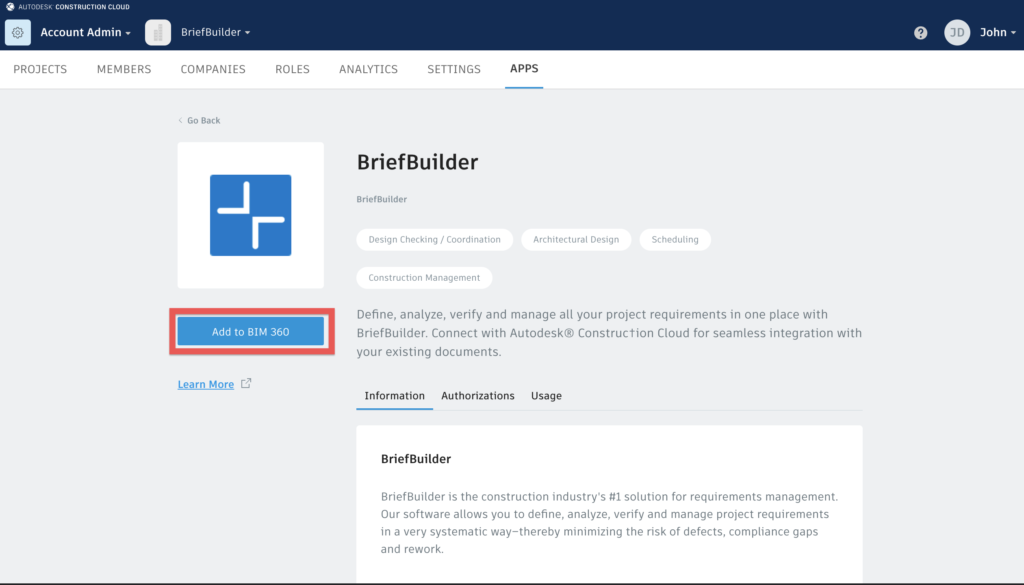
2. On the BriefBuilder app page, click the “Add to BIM 360” button
3. Check the authorization requirements and when you are ready click “Authorize”.
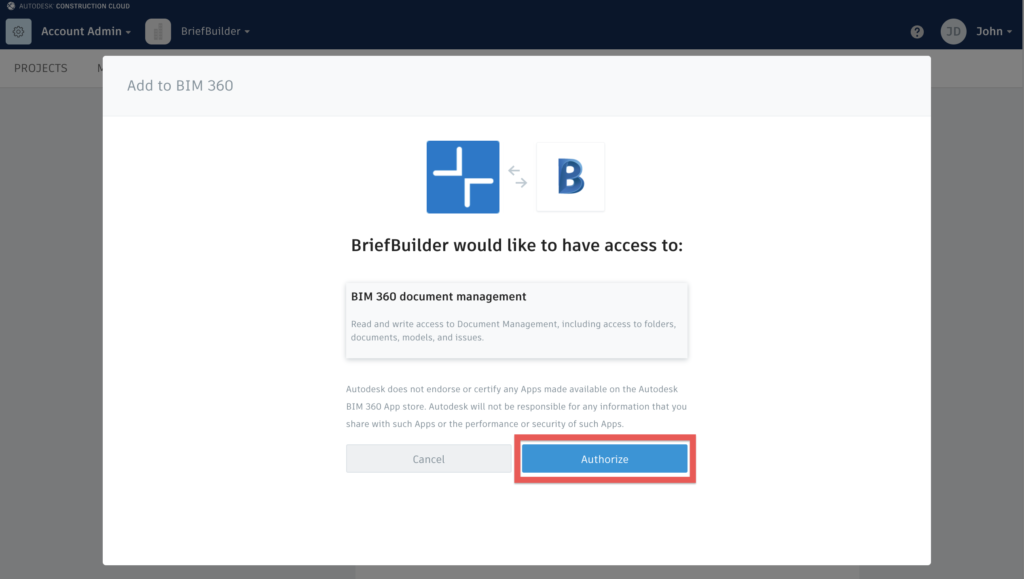
Please note that although the message notifies BriefBuilder might also get write access, this is in fact not the case. BriefBuilder will only read information. When individual users login to Autodesk to use the integration, this also becomes clear as we will request “Read access” as you can see here:
4. You are now done with the prerequisites and can continue in BriefBuilder with the next step.